
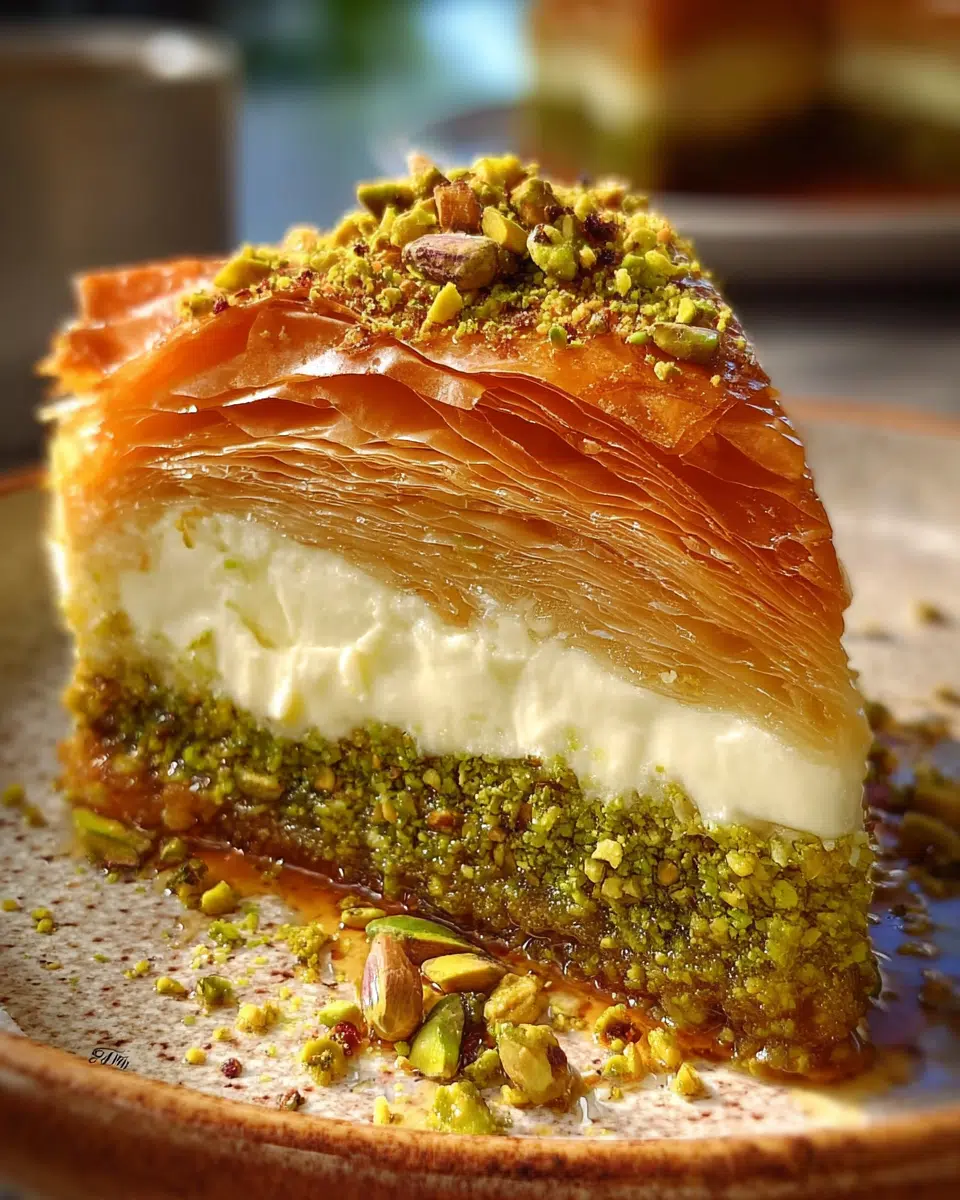
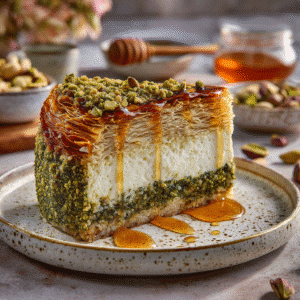
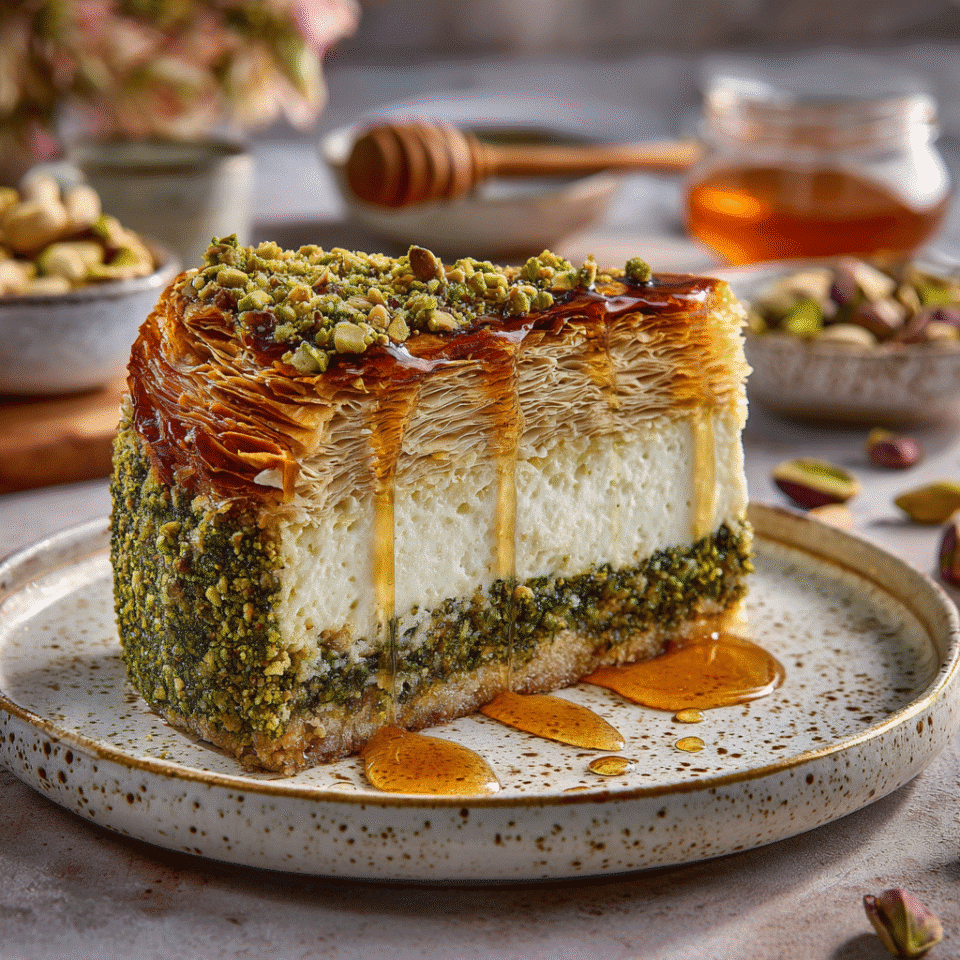
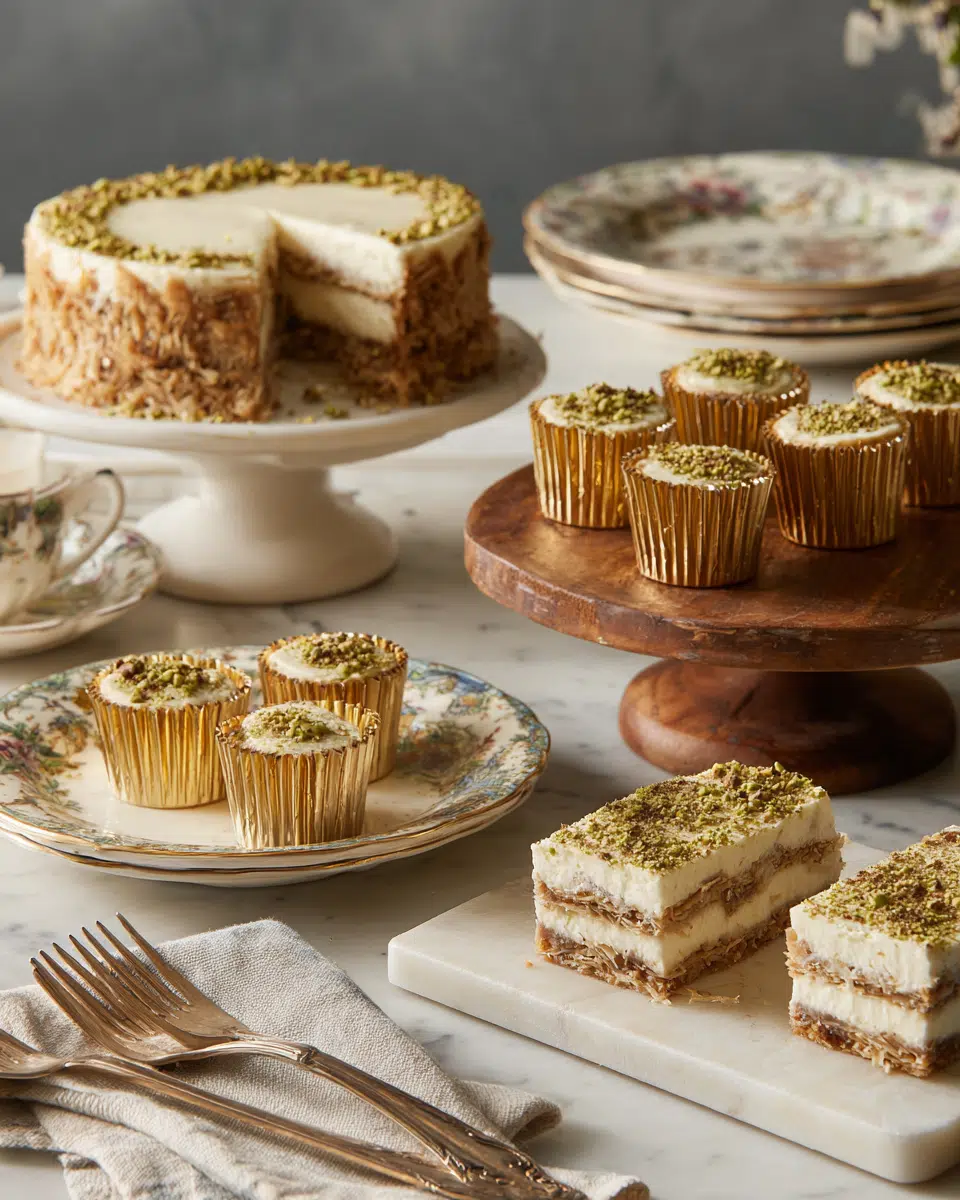
Baklava Pistachio Cheesecake isn’t just a dessert — it’s a showstopper that merges the flaky, syrup-soaked elegance of traditional baklava with the creamy richness of classic cheesecake. With every bite, you get crisp filo layers, nutty pistachios, velvety filling, and a sweet honey drizzle that ties it all together. It’s a bold, beautiful fusion that feels both indulgent and celebratory.
Whether you’re baking for a special occasion or just love the idea of combining two iconic desserts, this guide covers everything you need: from choosing ingredients and layering filo like a pro, to storing leftovers and freezing for later.
Looking for more cheesecake inspiration? Don’t miss our Pecan Crème Brûlée Cheesecake Minis for a bite-sized twist on a classic.
Sweet Navigation
What is Baklava Pistachio Cheesecake?
The Origins: Combining Baklava and Cheesecake
Baklava Pistachio Cheesecake is more than a trendy mashup — it’s a dessert that bridges cultures and cravings. On one side, you have baklava, a centuries-old Middle Eastern and Mediterranean sweet made with thin filo dough, crushed nuts (often pistachios or walnuts), and honey or syrup. On the other side is the beloved cheesecake, a rich, creamy dessert with roots in ancient Greece but modern fame thanks to New York-style variations.
Blending these two brings something spectacular: the textural contrast of crisp pastry and silky filling, the warmth of honey, and the earthy bite of pistachio. It’s a dessert that tells a story with each layer — one that’s both nostalgic and new.
Key Components: Filo, Pistachio, Honey, and Cream Cheese
To understand why this fusion works so well, it helps to look at the star ingredients:
- Filo Pastry: Ultra-thin sheets that bake up golden and crisp, creating a flaky base and topping.
- Pistachios: Their subtle, buttery flavor and vibrant green color give the dessert both taste and visual appeal.
- Honey: Drizzled between layers and on top, it acts as a natural sweetener and glaze.
- Cream Cheese Filling: Smooth, tangy, and rich — the heart of every great cheesecake.
This isn’t just a dessert. It’s a textural journey, a flavor bomb, and a gorgeous centerpiece — all in one.
Ingredients & Preparation Steps
Choosing the Right Filo Pastry and Pistachios
The success of Baklava Pistachio Cheesecake starts with your base ingredients. Filo pastry (also spelled phyllo) can be delicate and tricky to handle, so make sure you’re using high-quality sheets. Look for ones labeled as “fine” or “for baklava.” Always keep them covered with a slightly damp towel while working, as they dry out quickly.
As for pistachios, go for raw, unsalted, and shelled varieties. Roasting them lightly yourself brings out their natural oils and a deeper flavor. Finely chop them for the layers, but reserve a few extra whole or roughly chopped ones for garnish.
Tip: Pulse pistachios in a food processor for a finer texture, perfect for even layers.
Tips for Making the Cheesecake Filling Smooth and Stable
The cheesecake layer needs to strike a balance — rich and creamy without being overly dense. Here’s how to get it right:
- Use room temperature ingredients: This prevents lumps and ensures everything blends smoothly.
- Cream cheese should be full-fat and well-whipped until fluffy.
- Greek yogurt adds a slight tang and creaminess that lightens the texture.
- Eggs help the filling set, but avoid overbeating them, which can cause cracks.
- Vanilla extract rounds out the flavors.
Blend until just smooth and pour over the pistachio layer. Let it rest a minute to settle, then top with your final filo sheets for a golden, crisp finish.
Baklava Pistachio Cheesecake
Equipment
- 9-inch springform pan
- pastry brush
- mixing bowls
- electric mixer
- knife
- spatula
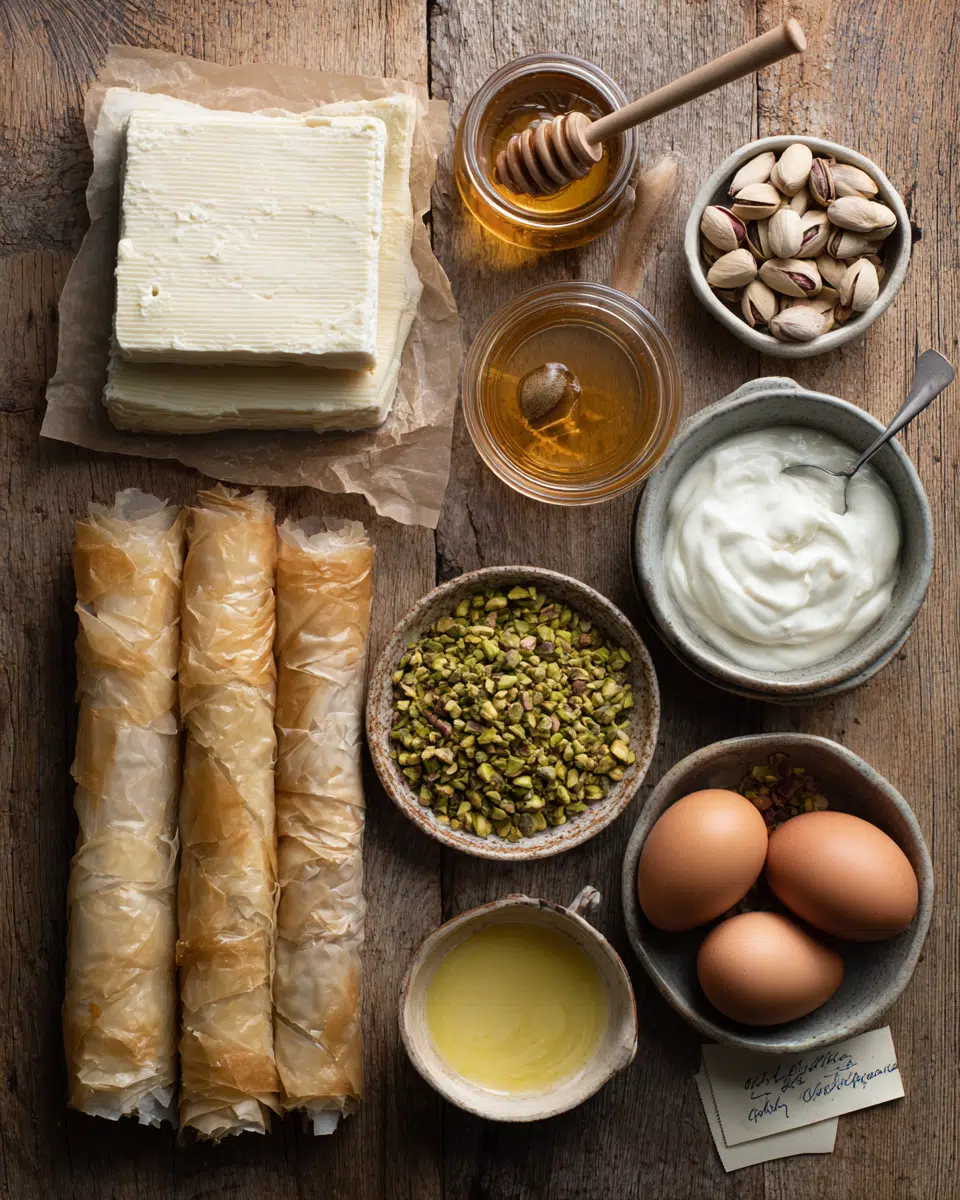
Ingredients
- 1 pack filo dough (thawed if frozen)
- 200 g raw unsalted pistachios, finely chopped (plus more for garnish)
- 120 ml honey (plus extra for drizzling)
- 100 g unsalted butter, melted
- 450 g full-fat cream cheese, softened
- 150 g Greek yogurt
- 100 g granulated sugar
- 2 large eggs
- 1 tsp vanilla extract
Instructions
- Preheat oven to 325°F (160°C). Grease a 9-inch springform pan and line the bottom with parchment. Brush 6–8 filo sheets individually with melted butter, layering them into the base and sides. Bake base for 8–10 minutes until lightly golden.
- Spread half the chopped pistachios evenly over the base. Drizzle with a few tablespoons of honey.
- In a bowl, beat cream cheese, Greek yogurt, and sugar until smooth. Add eggs and vanilla; beat just until combined.
- Pour the filling over the pistachio layer and smooth the top. Let sit briefly to settle.
- Layer 6–8 more buttered filo sheets on top, tucking edges in or trimming. Lightly score into portions for clean slicing after baking.
- Bake for 60–70 minutes until set but slightly jiggly in center. Tent with foil if top browns too quickly.
- Turn off oven and crack door. Cool cheesecake inside for 30–60 minutes. Then refrigerate at least 4 hours or overnight.
- Drizzle chilled cheesecake with extra honey and garnish with remaining pistachios. Slice and serve.
Notes
Nutrition
Baking & Cooking Techniques
Oven Temperature, Timing, and Handling Filo Layers
Baking Baklava Pistachio Cheesecake isn’t difficult, but it does require precision. Preheat your oven to 325°F (160°C) — a slightly lower temperature helps the cheesecake cook gently without overbrowning the top filo.
When layering filo, use a soft-bristled pastry brush to apply butter evenly between sheets. Each layer should be fully covered but not soaked. This step is essential for getting that perfect crispy finish without burning.
Bake the assembled cheesecake for 60 to 70 minutes, or until the center is mostly set and only slightly wobbly when nudged. If the top begins to brown too quickly, loosely tent it with foil during the final 20 minutes.
Pro Tip: Use clarified butter for brushing filo — it adds flavor without excess moisture.
How to Avoid Soggy or Overcooked Layers
One of the biggest challenges with a layered dessert like this is balancing textures. You want the base to stay crisp, the cheesecake to be smooth, and the top to be golden.
To avoid a soggy bottom:
- Prebake the bottom filo layers for 8–10 minutes before adding the filling.
- Make sure your pistachio-honey mixture isn’t too wet — drain any excess syrup.
- Avoid overfilling the pan, which can cause leaks or steam buildup.
For an evenly baked cheesecake:
- Use a water bath or place a pan of water on the rack below your cheesecake to maintain moisture in the oven.
- Let the cheesecake cool slowly inside the oven with the door slightly ajar for about 30 minutes before refrigerating.
For more creamy dessert tips, visit our No‑Bake Pumpkin Cheesecake recipe — no oven needed, but the same smooth result.
Common Mistakes & How to Avoid Them
Top 3 Common Pitfalls (Soggy Bottom, Cracked Filling, Burnt Filo)
Even experienced bakers can run into trouble with layered desserts like this one. Here are three of the most common mistakes — and how to prevent them:
- Soggy Bottom Layers:
This usually happens when the filo isn’t baked long enough or the pistachio-honey mixture is too wet. To fix this:- Prebake the base filo layers for 8–10 minutes.
- Use a light hand with honey in the bottom layer.
- Let the cheesecake cool on a rack so steam doesn’t get trapped underneath.
- Cracked Cheesecake Filling:
Cracks usually mean the filling was either overmixed, overbaked, or cooled too quickly. Avoid this by:- Mixing only until smooth — don’t whip the eggs excessively.
- Baking low and slow at 325°F (160°C).
- Letting the cheesecake cool gradually in the oven before refrigerating.
- Burnt or Dry Filo:
Thin filo sheets are delicate and can burn if left uncovered for too long. Prevent this by:- Brushing each sheet with butter (not just the top one).
- Covering the cheesecake loosely with foil in the final 15–20 minutes of baking if it browns too fast.
Fixes & Preventative Measures
Mistakes don’t mean failure — most can be salvaged or adjusted next time:
- If the filo top is too dark but still edible, simply dust with powdered sugar or add extra chopped pistachios as garnish.
- If the filling cracks, drizzle generously with honey to hide imperfections — it adds gloss and flavor.
- A soggy base? Serve chilled, not warm, and slice with a sharp knife to maintain structure.
Storage & Serving
Best Practices for Cooling and Chilling
Once your Baklava Pistachio Cheesecake is out of the oven, resist the urge to cut into it too soon. Proper cooling is key to achieving clean slices and balanced texture.
- Cool slowly: Turn off the oven, crack the door, and let the cheesecake sit for 30 minutes to an hour. This gradual change in temperature helps prevent cracking.
- Chill completely: After it reaches room temperature, cover it gently with foil or plastic wrap and refrigerate for at least 4 hours — ideally overnight. This gives the flavors time to meld and the layers to firm up.
During chilling, the honey glaze seeps slightly into the filo and pistachios, enhancing the sweetness without making it soggy.
How Long It Stays Fresh; Ideal Serving Suggestions
Baklava Pistachio Cheesecake can be stored in the refrigerator for up to 5 days. Keep it in an airtight container or covered tightly to preserve the texture and prevent it from absorbing fridge odors.
To serve:
- Use a sharp serrated knife and wipe it clean between slices.
- Serve chilled or let it rest at room temperature for 15 minutes for a softer texture.
- Add a fresh drizzle of honey or a sprinkle of crushed pistachios just before serving for added freshness and flair.
Optional twist: Serve with a dollop of whipped cream infused with orange zest for a citrusy finish.
Want a lighter option? Try our Lemon Mascarpone Mousse Cups — no filo required, but plenty of creamy, citrusy flavor.
Freezing Baklava Cheesecake
Can You Freeze It? What Happens to Texture and Flavor
Yes — Baklava Pistachio Cheesecake can be frozen, but there are a few things to consider. While the creamy cheesecake layer holds up well in the freezer, the filo layers tend to soften, losing their signature crunch. That said, if you’re freezing leftovers or prepping ahead, it’s still a worthwhile option.
What you can expect:
- Texture: Slightly softer filo, especially on the bottom.
- Flavor: Still rich and delicious — the pistachios and honey stay vibrant.
For the best experience, freeze slices rather than the whole cake. This allows for easier defrosting and prevents waste.
How to Properly Freeze and Thaw
To freeze:
- Cool the cheesecake completely.
- Slice into portions and wrap each slice tightly in plastic wrap, then foil.
- Place slices in a freezer-safe bag or container and label with the date.
To thaw:
- Move slices to the refrigerator and let thaw overnight.
- Avoid microwaving — it creates steam that ruins the texture of the filo.
- Before serving, add a fresh honey drizzle and crushed pistachios to revive the look and flavor.
Pro Tip: If crunch matters, reheat the top layer in a toaster oven for 2–3 minutes before serving.
Is It Worth the Effort?
Cost vs Reward: Time, Ingredients, Attention Needed
Let’s be honest — Baklava Pistachio Cheesecake isn’t your average, toss-it-in-the-oven dessert. It takes time, patience, and a bit of finesse. From layering delicate filo sheets to whipping a flawless cheesecake filling, it demands attention at every step.
Ingredient-wise, it’s also not the cheapest dessert to make. Pistachios, cream cheese, and filo dough add up quickly, and you’ll need plenty of butter and honey too.
But here’s the trade-off: you’re not just making dessert — you’re making a centerpiece. The final product is stunning to look at, decadent to taste, and deeply memorable for guests.
If you love baking, enjoy a kitchen challenge, or want to impress for a special occasion, the effort is absolutely worth it.
Flavor & Wow Factor: Why This Dessert Stands Out
Baklava Pistachio Cheesecake is in a league of its own when it comes to flavor. The combination of buttery crunch, nutty richness, silky filling, and floral honey is simply unforgettable.
What really makes it stand out:
- The contrast of textures in each bite
- A bold visual presentation — golden filo, vibrant pistachios, glossy honey
- That feeling when someone takes their first bite and says, “Wow.”
Whether you’re making it for a holiday table, a dinner party, or a just-because moment, this dessert is a true showstopper.
Conclusion
Baklava Pistachio Cheesecake is more than just a dessert — it’s an experience. Each layer brings something different to the table: the crisp filo crunch, the nutty richness of pistachios, the creamy tang of cheesecake, and the golden drizzle of honey. Whether you’re baking it for a festive gathering or simply craving a challenge in the kitchen, this recipe delivers bold flavor and beautiful results.
With the right ingredients, a few smart techniques, and a little patience, you’ll have a dessert that’s both eye-catching and unforgettable. And if you’re craving more cheesecake magic, don’t miss our No-Bake Pumpkin Cheesecake — it’s a chilled delight that pairs perfectly with the seasons.
Frequently Asked Questions
What are some common baklava mistakes?
Common baklava errors include using dry filo sheets (they crack), overbaking the layers (which leads to bitterness), and oversaturating with syrup or honey (causing sogginess). With cheesecake versions, watch out for layering mistakes and uneven baking. Always keep filo covered while working and measure ingredients precisely.
How to store baklava cheesecake?
Store your baklava cheesecake in the fridge, tightly covered or in an airtight container. It keeps best for up to 5 days. For clean slices, refrigerate at least 4 hours before cutting. Avoid stacking slices — the filo topping can crumble or turn soft.
Can baklava cheesecake be frozen?
Yes! It freezes well for up to one month. Slice before freezing, and wrap each piece in plastic wrap and foil. Thaw in the fridge overnight. The filo may soften, but the cheesecake and pistachio flavor remain intact. Re-crisp the top layer in a toaster oven if desired.
Is baklava cheesecake worth the effort?
Absolutely — if you enjoy creative baking and want a dessert that makes a lasting impression. It does take time, but the result is a rich, flavorful masterpiece that blends two iconic treats into something truly special.
For more crave-worthy creations, join me on Facebook and pin your favorite dishes straight to Pinterest.