

Table of Contents
Carvel ice cream cake is more than just a dessert — it’s a tradition wrapped in layers of creamy ice cream, crunchy chocolate, and whipped frosting. Loved by both kids and adults, Carvel cakes are a staple at birthdays, graduations, and casual get-togethers. In this article, we’ll walk you through everything you need to know about this iconic treat: what makes it special, how to store it properly, ways to personalize it, and how to keep it from melting during your next party. Whether you’re a longtime fan or trying it for the first time, this guide has got you covered.
Looking for inspiration? Try our favorite summer treat: Mango Ice Cream Recipe
What Is a Carvel Ice Cream Cake?
History and legacy of Carvel brand
Carvel is a legendary American ice cream brand that dates back to 1929. Founded by Tom Carvel, who accidentally discovered the magic of soft-serve ice cream after his truck tire went flat, the brand has since become synonymous with frozen desserts. By 1934, Tom opened his first store and began perfecting what would later become the iconic Carvel ice cream cake.
Known for its fun, family-friendly personality, Carvel brought joy to millions with their creative advertising and signature cakes like Fudgie the Whale and Cookie Puss. Their cakes combine traditional soft-serve ice cream with layers of crunchy chocolate pieces, creating a texture and flavor unlike any other store-bought dessert.
Why Carvel cakes are different from other ice cream cakes
So, what sets Carvel apart from the rest? It’s all about the layers.
Each Carvel ice cream cake includes a rich foundation of vanilla and chocolate ice cream. What really makes it unique, though, is the layer of chocolate crunchies — a secret blend of chocolate cookie pieces that adds texture to every bite. The cake is then topped with whipped frosting, which is lighter than buttercream and adds just the right amount of sweetness without overpowering the ice cream.
Another major difference is the softness of the ice cream. Because Carvel uses soft-serve in its cakes, they’re easier to cut and serve right out of the freezer, no hacking required. Plus, the nostalgic look of the cake and familiar taste hit that perfect combo of comfort and fun.
Check out another classic dessert idea: Delicious Chocolate Wafer Cookies
Popular Flavors and Layers of Carvel Ice Cream Cake
Classic layers: vanilla, chocolate, and crunchies
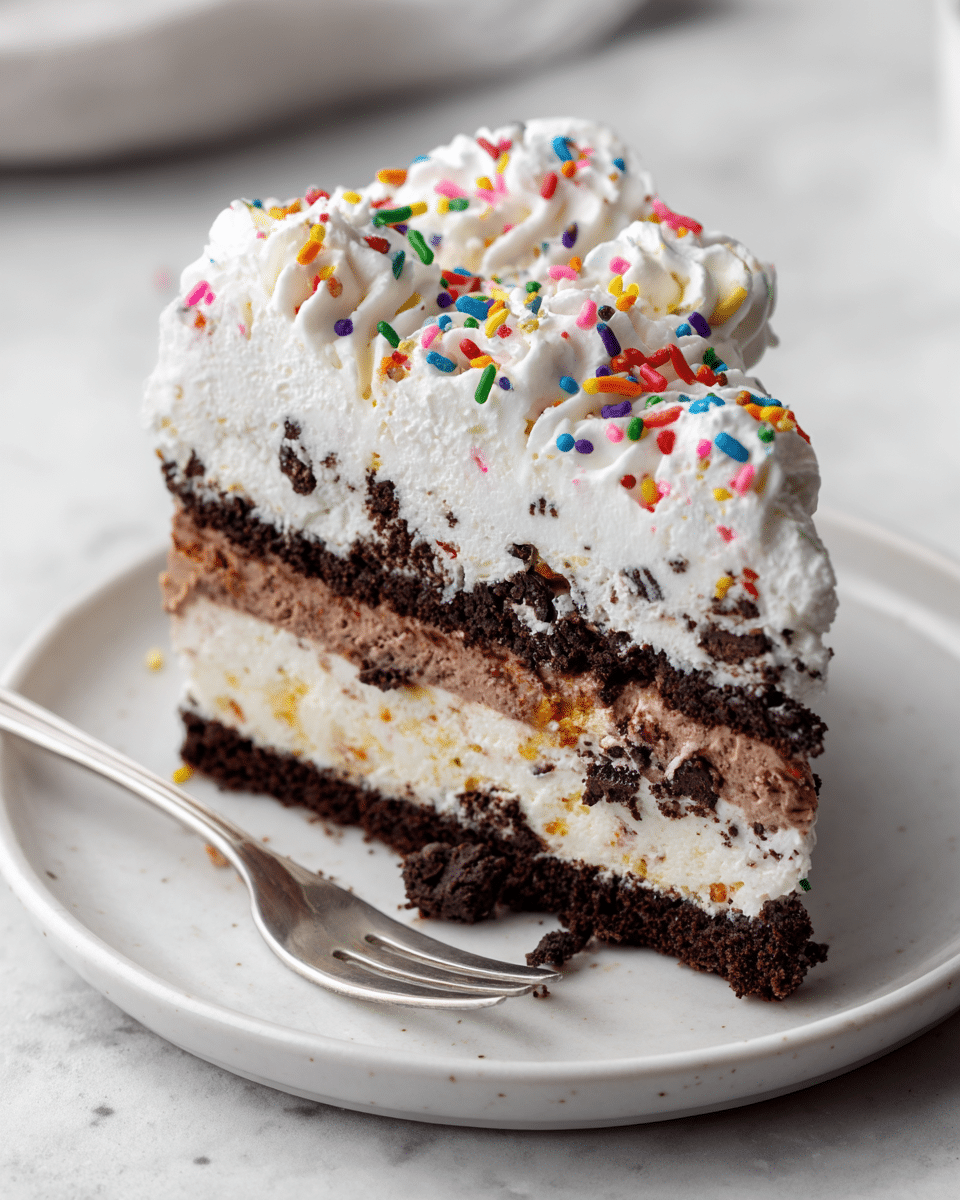
If there’s one thing Carvel ice cream cake is known for, it’s the perfect harmony between creamy layers and a crunchy surprise. At the heart of every Carvel cake lies a simple but unbeatable formula: vanilla ice cream + chocolate ice cream + chocolate crunchies.
The base typically starts with smooth chocolate ice cream, followed by a generous mid-layer of chocolate crunchies, which adds that signature texture fans love. Then comes a layer of vanilla ice cream, creating a balance of richness and lightness in every bite. Finally, the whole cake is topped with whipped frosting and colorful sprinkles or themed decorations depending on the occasion.
This trio of textures — creamy, crunchy, and fluffy — is what keeps customers coming back.
Here’s a quick breakdown:
| Layer | Description |
|---|---|
| Bottom Layer | Chocolate soft-serve ice cream |
| Middle Layer | Crunchy chocolate cookie pieces |
| Top Layer | Vanilla soft-serve ice cream |
| Frosting | Whipped topping, usually white or colored |
| Extras | Sprinkles, themed décor, or edible images |
This standard version is sold in most supermarkets, convenience stores, and Carvel locations.
Limited edition and seasonal varieties
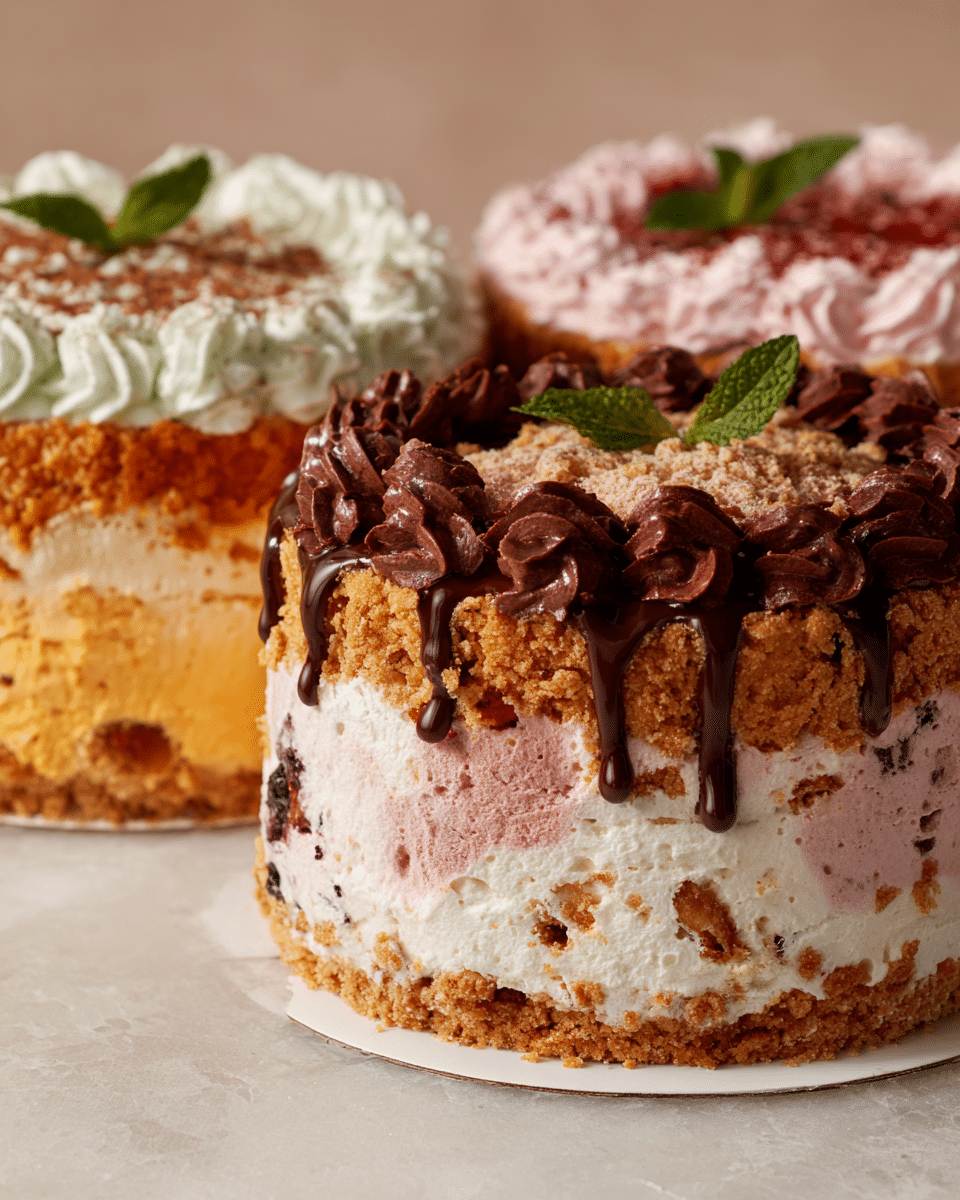
Carvel doesn’t stop at vanilla and chocolate. Over the years, they’ve introduced seasonal and limited-time flavors that shake things up for holidays, events, or collaborations. These include:
- Pumpkin spice cake – launched during fall for Thanksgiving fans
- Birthday cake-flavored ice cream – a popular twist for celebrations
- Mint chocolate chip – a hit during the winter holiday season
- Strawberry crunch – ideal for spring and summer lovers
Some cakes are also made to celebrate specific characters or events, with themed frosting and edible images — perfect for kids’ birthdays or special events. You can even find gluten-free and nut-free options at certain locations.
Want something more homemade? Discover great ideas like this: Savory Yogurt with Roasted Figs.
How Long Does a Carvel Ice Cream Cake Last?
Shelf life in freezer (store-bought vs homemade)
If you’ve bought a Carvel ice cream cake for a party and ended up with leftovers, you might be wondering: how long can it last in the freezer?
Here’s the good news: a store-bought Carvel ice cream cake can last up to 7 days in your freezer while maintaining its flavor and texture. After that point, the cake may start to develop freezer burn or taste stale, especially if it’s not stored properly. Homemade or custom cakes (without preservatives) typically last a bit less — about 3 to 5 days for best quality.
To get the most out of your Carvel cake:
- Wrap the cake in plastic wrap or aluminum foil if the box is open
- Store it at a constant 0°F (-18°C) or below
- Avoid refreezing once it’s been thawed or partially melted
For maximum freshness, consume it within the first few days. If the cake was bought for a specific event, buy it 1–2 days before and keep it tightly sealed until you’re ready to serve.
Here’s a quick comparison table:
| Type of Cake | Freezer Shelf Life | Best Practices |
|---|---|---|
| Store-bought Carvel | 5–7 days | Keep in original box or wrap tightly |
| Custom Carvel | 3–5 days | Store airtight, consume quickly |
| Homemade version | 2–4 days | Use freezer-safe container |
Signs your Carvel cake has gone bad
Not all ice cream cakes stay delicious forever. Here are a few warning signs that your Carvel ice cream cake is past its prime:
- Ice crystals on top or sides (a sign of freezer burn)
- Change in texture (ice cream feels gritty or spongey)
- Off or sour smell coming from the cake
- Discoloration of the frosting or layers
- Weird taste — if it doesn’t taste right, it’s not worth the risk
A well-stored cake should still look and smell sweet. If anything seems off, it’s safer to toss it.
Don’t miss our unique frozen dessert idea: Mexican Ice Cream.
Do You Need to Defrost a Carvel Ice Cream Cake?
Recommended thawing time and technique
Yes, you absolutely need to defrost a Carvel ice cream cake — but just a little.
Carvel cakes are made with soft-serve-style ice cream, which means they’re already easier to cut than other frozen cakes. Still, if served straight from the freezer, they can be too firm, especially around the edges. To enjoy the perfect texture and flavor, Carvel recommends taking the cake out of the freezer about 30 minutes before serving.
Here’s the best way to defrost a Carvel cake:
- Remove it from the freezer and place it (in the box) in the refrigerator or on your counter.
- Leave it at room temperature for 20–30 minutes for best results.
- Don’t use a microwave or oven to speed up thawing — you’ll ruin the frosting and texture.
- Cut with a warm knife by dipping it in hot water and wiping dry between cuts.
By letting it sit just long enough, you’ll ensure the frosting softens slightly and the cake becomes easy to slice without melting all over the place.
What happens if you serve it too frozen or too soft?
Timing is everything with ice cream cake. If you serve your Carvel cake too frozen, you may struggle to cut it and end up with crumbled slices. Plus, the frosting will taste hard and icy rather than creamy. On the flip side, if you leave it out too long, you risk turning that beautiful cake into a melted mess — and fast.
Here’s what can happen:
| Situation | Result | Fix |
|---|---|---|
| Too frozen | Hard to slice, crunchy texture | Let sit for 10–15 more minutes |
| Too soft (melting) | Loss of shape, runny frosting | Return to freezer for 5–10 mins |
| Just right (20–30 mins) | Creamy, easy to cut, flavorful | Serve immediately |
Carvel’s whipped frosting is especially sensitive to heat, so monitor it closely. If you’re serving a crowd, slice the cake all at once, then return extra slices to the freezer immediately.
Customizing Your Carvel Ice Cream Cake
How to personalize cakes with messages and designs
One of the coolest things about Carvel ice cream cake? You can customize it to fit any celebration, big or small. Whether it’s a birthday, graduation, baby shower, or holiday party, Carvel lets you add that personal touch.
Here’s how you can customize your cake:
- Add a name or message: Most Carvel stores will write personalized messages on top with colorful icing.
- Pick your theme: From Disney characters to sports teams, you can select a design to match the occasion.
- Choose your frosting color: Want a pink cake for a baby shower? No problem. Prefer blue and gold for a graduation? Done.
- Decorations and extras: You can include sprinkles, chocolate drizzle, or even edible photos on the cake.
If you’re placing an order in-store, just give them your custom message and design preferences. Online, Carvel’s website offers a “Build Your Cake” tool where you can preview your design and submit your order.
Here’s what you can usually personalize:
| Custom Option | Details |
|---|---|
| Text on Cake | Names, phrases like “Happy Birthday Emma!” |
| Color Theme | Custom frosting and border colors |
| Character or Logo | Licensed themes (cartoons, movies, sports) |
| Edible Photo | Upload your own picture to print on frosting |
Whether you go classic or full-on creative, your Carvel cake can reflect your personal style — and still taste amazing.
Where and how to order a custom cake
Ordering a customized Carvel cake is super simple, and you’ve got a few flexible options:
In-store orders:
Visit a Carvel location near you and speak with the staff. Most locations can take your order and have it ready within 24–48 hours.
Third-party stores:
Big-name retailers like Walmart, Stop & Shop, and Publix often carry pre-decorated Carvel cakes in the freezer aisle. These aren’t customizable, but they’re great if you’re in a pinch.
Pro tip: Always call ahead to make sure your desired customization is available — especially around busy holidays like Mother’s Day or the Fourth of July.
BONUS: Homemade Carvel Ice Cream Cake Recipe (Step-by-Step)
Why make it at home?
Misschien heb je geen Carvel-winkel in de buurt, of wil je gewoon je eigen draai geven aan deze iconische ijstaart. Goed nieuws: met een paar eenvoudige ingrediënten kun je thuis een Carvel-style ice cream cake maken die net zo romig, knapperig en feestelijk is.

Ingredients You’ll Need
| Ingredient | Quantity |
|---|---|
| Chocolate ice cream (softened) | 1.5 quarts |
| Vanilla ice cream (softened) | 1.5 quarts |
| Chocolate wafer cookies (crushed) | 1.5 cups |
| Chocolate syrup or fudge sauce | ½ cup |
| Whipped topping (like Cool Whip) | 2 cups |
| Rainbow sprinkles (optional) | For decoration |
| Springform pan (9-inch) | 1 |
| Parchment paper (optional) | For lining |
Step-by-Step Instructions
Step 1: Prepare your pan
- Line a 9-inch springform pan with parchment paper (bottom and sides). This makes removing the cake easier.
- Place the pan in the freezer to chill for 10 minutes while you prep.
Step 2: Create the crunchy middle layer
- Crush the chocolate wafer cookies into fine crumbs using a food processor or ziplock bag + rolling pin.
- Mix with chocolate syrup or fudge sauce until the texture is like wet sand. This will mimic Carvel’s famous crunchies.
Step 3: Layer the chocolate ice cream
- Take the chocolate ice cream out of the freezer and let it soften for about 10 minutes.
- Spread it evenly into the bottom of the pan using a spoon or spatula.
- Place in the freezer for 20 minutes to firm up.
Step 4: Add the crunchy layer
- Remove the pan from the freezer.
- Evenly sprinkle the cookie crumb mix on top of the chocolate layer. Press down lightly with the back of a spoon.
- Freeze again for 10–15 minutes.
Step 5: Add the vanilla ice cream
- Let the vanilla ice cream soften slightly.
- Spread it gently over the crunch layer. Smooth the top as flat as possible.
- Freeze for at least 2 hours or until firm.
Step 6: Add the whipped topping
- Remove cake from the freezer and unmold it by gently releasing the springform sides.
- Spread whipped topping over the top and sides of the cake.
- Add sprinkles or decorations as desired.
Step 7: Final chill and serve
- Return the decorated cake to the freezer for at least 1 hour before serving.
- Slice with a warm knife for clean cuts. Enjoy!
Tips for Best Results
- Don’t skip the freezing between layers — this keeps the cake structured.
- Use good-quality ice cream for maximum flavor.
- Want to switch it up? Try mint chip or cookies and cream for one of the layers.
- Freeze leftovers wrapped tightly for up to 5 days.
This DIY version is a hit at parties! You control the flavors, toppings, and decoration — all with that classic Carvel texture.
How to Transport and Store Ice Cream Cake
Tips for carrying it from store to home
Transporting an ice cream cake, especially a Carvel one layered with soft-serve and whipped frosting, requires a little planning. You don’t want that beautiful dessert to arrive as a melted mess, right? Here’s how to get your Carvel cake home safely and intact.
Use these practical tips:
- Keep it in the box: Carvel packages cakes in insulated boxes that help hold the cold longer. Don’t remove the cake until you’re ready to serve.
- Bring a cooler or insulated bag: If you’re driving more than 10–15 minutes, place the boxed cake inside a cooler with ice packs.
- Use freezer packs or dry ice for long drives. Just make sure the cake doesn’t sit directly on dry ice — it can freeze-burn the surface.
- Avoid direct sunlight: Keep the box shaded, ideally in your car’s air-conditioned cabin.
- Go straight home after pickup. No errands on the way!
Pro Tip: If you’re ordering from a grocery store, check if they can store the cake in their freezer until the moment you leave.
Ideal freezer storage conditions
Once you get home, pop the cake into the coldest part of your freezer, usually the back wall — not the door, which is the warmest spot due to frequent opening.
Here’s how to store it properly:
- Don’t open the box until you’re ready to serve. Opening allows in warm air and introduces moisture.
- Re-wrap leftovers tightly in plastic wrap or foil, then place them in an airtight container. This prevents freezer burn.
- Maintain a constant temperature of 0°F (-18°C) or colder.
- Label it with a date. That way, you’ll know when to toss if it sits too long.
Storage do’s and don’ts:
| Do | Don’t |
|---|---|
| Use airtight wrap and containers | Leave cake uncovered in freezer |
| Store in coldest part of freezer | Keep in the freezer door |
| Consume within 5–7 days | Refreeze melted portions |
Following these simple storage steps ensures your Carvel cake keeps its creamy texture, iconic crunch, and delicious flavor — even after the party’s over.
How to Keep Ice Cream Cake from Melting at a Party
Serving techniques for longer-lasting cakes
When you’re hosting a party — especially during the summer — the biggest challenge with a Carvel ice cream cake isn’t slicing it. It’s keeping it from melting into a puddle before everyone gets their slice.
Here are proven serving strategies to keep your cake in shape:
- Serve immediately after removing from the freezer: Don’t let it sit out while guests arrive. Time it for right before dessert.
- Pre-slice the cake: Use a sharp knife dipped in hot water and quickly cut portions while the cake is still firm. This reduces melting time once out.
- Serve on chilled plates: Cold plates slow down melting from underneath.
- Limit cake exposure: Take out only what you need. Keep the rest frozen until seconds are needed.
Timing is key. You’ll want to allow 20–30 minutes of softening before slicing, but serve it within 10–15 minutes after cutting. After that, the frosting and crunchies start slipping fast.
Tools and hacks to keep it cool outdoors or indoors
Planning an outdoor birthday party or BBQ? Keeping your Carvel cake cool while celebrating outside takes some creative planning.
Try these effective hacks:
- Use a cooler filled with ice packs: Line the bottom with a towel and place the cake on top. Shut the lid until serving.
- Set the cake tray inside a larger tray of ice: This double-layer method keeps it cooler on the table.
- Freeze serving utensils and plates beforehand: It sounds simple, but chilled utensils keep the cake from sticking or melting on contact.
- Shade is everything: Keep the cake under a shaded table or tent, never in direct sun.
And finally, if you’re really going for presentation, you can:
- Wrap dry ice in paper towels and place it inside the cooler (away from direct contact with the cake). It keeps the air cooler longer than standard ice.
- Design a “dessert station” indoors where guests can grab their cake from inside before returning outdoors.
With a few easy tweaks, your Carvel ice cream cake will stay party-perfect and photo-ready — even in July.
How long will a Carvel ice cream cake last?
A Carvel ice cream cake will last 5 to 7 days in your freezer if properly stored. Keep it in its original box or wrap it tightly in plastic wrap and foil. For best flavor and texture, try to finish it within the first few days. After a week, the cake may develop freezer burn or lose its creamy consistency.
Do I need to defrost a Carvel ice cream cake?
Yes, Carvel recommends letting the cake sit at room temperature for 20–30 minutes before serving. This allows the whipped frosting to soften and makes slicing easier. Avoid using the microwave or other heating methods — they can ruin the texture of the ice cream and frosting.
Can you customize a Carvel ice cream cake?
Absolutely! Carvel offers full customization for text messages, colors, and even themed designs. You can choose from various sizes, frosting colors, and character themes — or even upload an image to print on the cake. Custom orders are available both in-store and online, with a typical turnaround time of 24–48 hours.
How to keep ice cream cake from melting at a party?
To prevent your Carvel ice cream cake from melting, follow these tips:
Keep it in the freezer until just before serving
Pre-slice and serve quickly
Use cold plates and utensils
Place it in a cooler or over a tray of ice for outdoor events
Store extra slices back in the freezer immediately
With the right tools and timing, your cake can stay delicious and intact even at a summer party.
Conclusion
Carvel ice cream cake isn’t just a dessert — it’s a tradition layered with nostalgia, creamy goodness, and the perfect chocolate crunch. Whether you’re buying it for a birthday, customizing it for a celebration, or making your own at home, Carvel delivers joy in every slice. Now that you know how to store it, serve it, and even stop it from melting, you’re fully prepared to enjoy it like a pro. Want to go even further? Try making the DIY version and wow your guests with a homemade twist on a classic.
Craving more edible art? Follow my culinary adventures on Facebook and save your next masterpiece on Pinterest!
Print
Carvel Ice Cream Cake: How to Buy, Store, Customize & Serve It Right
- Total Time: 4 hours 30 minutes
- Yield: 10–12 servings
- Diet: Vegetarian
Description
A creamy, crunchy homemade ice cream cake with layers of chocolate, vanilla, and cookie crunchies – inspired by the classic Carvel cake.
Ingredients
1.5 quarts chocolate ice cream (softened)
1.5 quarts vanilla ice cream (softened)
1.5 cups crushed chocolate wafer cookies
1/2 cup chocolate syrup or fudge sauce
2 cups whipped topping
Rainbow sprinkles (optional)
Instructions
1. Line a 9-inch springform pan with parchment paper.
2. Soften chocolate ice cream and spread as the base layer.
3. Freeze for 20 minutes until firm.
4. Mix crushed cookies and chocolate syrup for the crunch layer.
5. Spread cookie crunch evenly over chocolate ice cream.
6. Soften vanilla ice cream and spread as the top layer.
7. Freeze for 2 hours or until firm.
8. Remove springform and spread whipped topping over cake.
9. Decorate with sprinkles if desired.
10. Freeze for 1 more hour before slicing and serving.
Notes
Use good-quality ice cream for best results.
Wrap leftover cake tightly and freeze up to 5 days.
Avoid microwaving to thaw — allow cake to sit at room temp for 20–30 minutes before serving.
- Prep Time: 30 minutes
- Cook Time: 0 minutes
- Category: Dessert
- Method: No-bake
- Cuisine: American