
Table of Contents
Introduction
The first time I made an earl grey panna cotta tart, I didn’t expect it to become my go-to dessert for dinner parties. The silky cream, steeped in fragrant bergamot tea, poured into a buttery tart shell—every bite felt like a gentle reminder of home. Growing up in the Netherlands, tea was more than a drink; it was an afternoon ritual. When I moved to California, I found comfort in creating recipes that blended familiar flavors with new ones. This tart is that bridge—elegant yet approachable, perfect for anyone craving a dessert that’s both simple and unforgettable. And yes, it’s a guaranteed showstopper at the table.
My First Taste of Earl Grey Panna Cotta Tart
The Day I Fell for Earl Grey Panna Cotta
I still remember the first time I tasted an earl grey panna cotta tart at a small café tucked in San Francisco’s Mission District. The cream was cool and luscious, barely holding its shape, with the unmistakable aroma of bergamot swirling around each forkful. The tart shell crumbled just enough to contrast that smooth filling. Back then, my baking skills were more ambitious than refined—I was still figuring out how not to overbake cookies, let alone master a dessert that looked like it belonged in a French patisserie. But the moment I finished that slice, I knew I’d try to recreate it in my kitchen.
What surprised me most was how approachable the flavors felt. Earl grey, with its gentle floral and citrus notes, wasn’t overpowering. It reminded me of the fragrant infusion I’d sip back in the Netherlands, paired with butter cookies or a slice of cake. That nostalgic connection made it easy to imagine bringing this tart to life at home, using simple pantry staples with one elegant twist: a tea-infused cream that would set like a dream.
Why Earl Grey Works Beautifully in Desserts
Earl grey is more than just black tea with citrus—its bergamot oil adds a delicate complexity that pairs effortlessly with creamy textures. In panna cotta, it infuses every spoonful with a whisper of sophistication. The tart format gives it structure, making it easier to slice and serve compared to the traditional unmolded panna cotta. That balance between light creaminess and a crisp, buttery crust is what makes this dessert irresistible. For more ways tea and fruit pair beautifully in sweets, you might love the vibrant ideas in my Dessert Salsa Recipes or even a fruity twist like the Apple Pie Salsa Recipe.
The secret to making the flavor shine is steeping the tea gently—just enough to draw out its essence without slipping into bitterness. With a few simple tricks, you can turn an everyday tart into a centerpiece that makes your guests pause after the first bite, then go in for seconds.
The Magic Behind a Perfect Panna Cotta Base
Balancing Cream, Milk, and Gelatin
A panna cotta is only as good as its texture. Too much gelatin and you’ll end up with something rubbery; too little and it won’t hold its shape. The sweet spot is a creamy wobble—firm enough to slice, yet soft enough to melt on your tongue. My rule is to combine equal parts heavy cream and whole milk for a balanced richness, then measure gelatin with care. For this tart, I bloom the gelatin in cold milk first, allowing it to dissolve completely before stirring it into the warm, tea-infused cream. That way, the gelatin distributes evenly, avoiding those unpleasant chewy patches.
It’s a technique I also use for frozen treats, where texture is just as important. If you’re curious about how creaminess works in chilled desserts, you might enjoy reading my Mexican Ice Cream recipe, which explores achieving smooth, scoopable results without ice crystals.
Infusing Earl Grey Without Bitterness
The beauty of earl grey lies in its fragrant, citrus-forward profile—but that charm can turn harsh if the tea steeps too long or the water is too hot. In panna cotta, I steep the tea leaves (or high-quality tea bags) in the warm cream for no more than five minutes. This extracts enough flavor to perfume the custard without leaving a bitter aftertaste. Once the infusion is done, I strain out the leaves immediately.
The result is a cream that’s subtly golden and irresistibly aromatic. Infusion-based desserts like my No-Bake Lavender Posset with Blackberries follow the same principle—flavor should be present but never overpowering. For this tart, the bergamot should dance with the vanilla and cream, not dominate them.
The magic is in restraint. A gentle hand with both gelatin and tea turns a simple panna cotta filling into something elegant enough for a dinner party, yet comforting enough to enjoy with a quiet cup of tea at home.
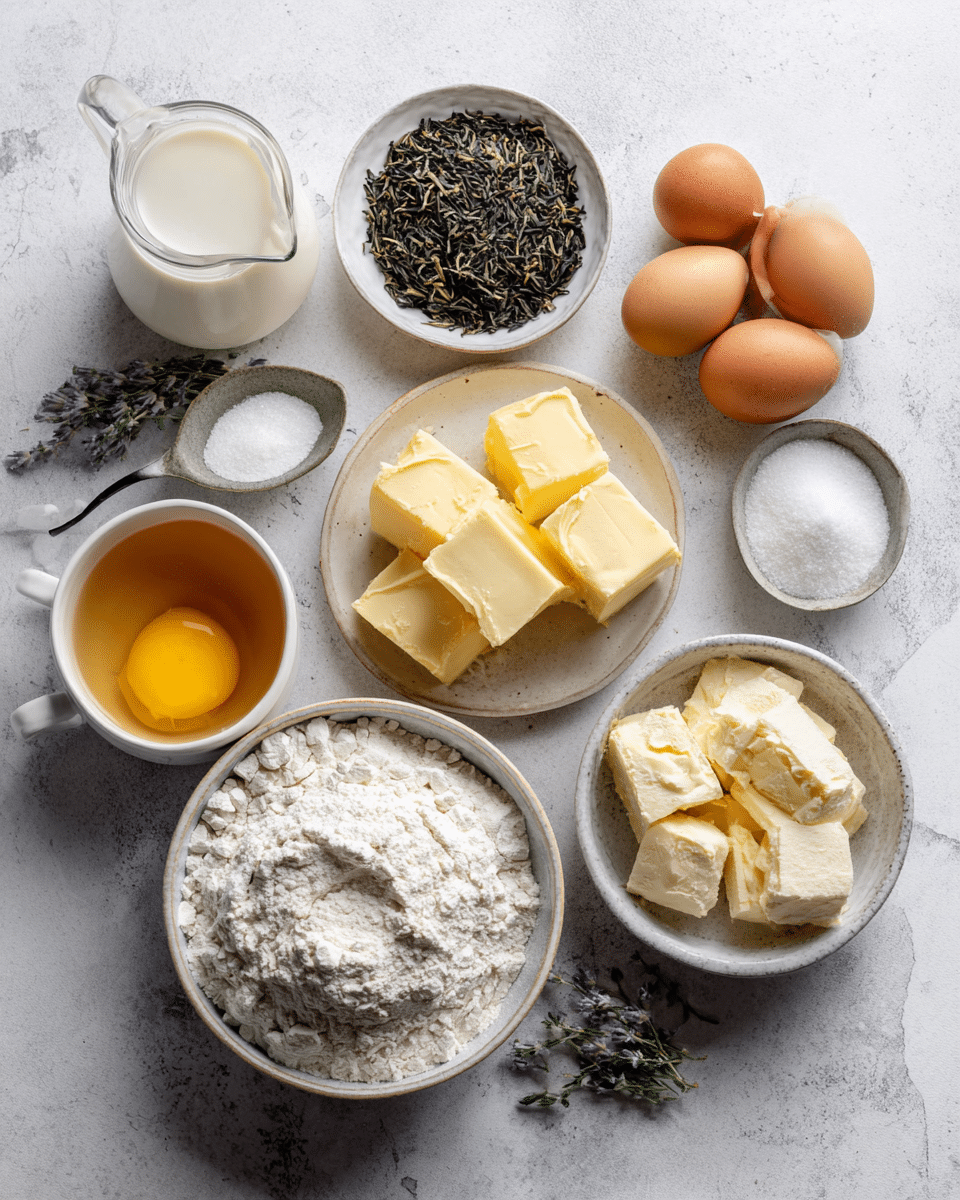
Ingredients
For the Panna Cotta Filling:
- 1 ¼ cups heavy cream
- 1 ¼ cups whole milk (divided: some for blooming gelatin)
- 2 tsp earl grey tea leaves (or 2 tea bags)
- ½ cup granulated sugar
- 2 tsp powdered gelatin
For the Tart Shell:
- 1 ¼ cups all-purpose flour
- ½ cup unsalted butter, chilled and cubed
- ¼ cup powdered sugar
- 1 large egg yolk
- Pinch of salt
For Garnish (Optional):
- Fresh berries
- Edible flowers
- Lemon zest or caramel drizzle
Step-by-Step Instructions
- Bloom the gelatin – Place the powdered gelatin in a small bowl with a few tablespoons of the cold milk. Let it sit for 5 minutes to soften.
- Infuse the cream – Heat the heavy cream with sugar until warm (not boiling). Add the earl grey tea leaves and steep for 5 minutes, then strain.
- Combine with gelatin – Stir the bloomed gelatin into the warm cream mixture until fully dissolved.
- Make the tart dough – Mix flour, powdered sugar, and salt. Cut in the butter until crumbly, then add the egg yolk. Knead lightly into a dough.
- Chill the dough – Wrap in plastic wrap and refrigerate for 30 minutes.
- Blind bake the tart shell – Roll the dough, fit into a tart pan, and bake at 350°F (175°C) for 20–25 minutes until golden. Let it cool completely.
- Fill and chill – Pour the panna cotta mixture into the cooled tart shell. Refrigerate for at least 3 hours or until set.
- Garnish and serve – Decorate with fresh berries, edible flowers, or lemon zest just before serving.
Building the Buttery Tart Shell
Choosing the Right Pastry for Panna Cotta
When it comes to holding a panna cotta filling, not every crust is up to the task. You need something sturdy enough to support the creamy custard but tender enough to give way under a fork. That’s why I almost always choose pâte sucrée—a sweet shortcrust pastry. It bakes into a crisp, golden shell that doesn’t crumble into dust, yet still feels delicate in the mouth.
To make sure it stays crisp even after filling, I blind-bake the tart shell until it’s fully golden, then let it cool completely before adding the panna cotta. Some bakers like to brush the inside with a thin layer of melted chocolate to create a moisture barrier—an extra touch that keeps the crust from softening too quickly.
This attention to texture is similar to the balance I aim for in my Rosemary Lemon Shortbread, where the crumb is tender but never soggy. In both cases, the trick lies in proper baking time and letting the crust rest before assembly.
Flavoring the Crust for a Subtle Twist
A tart shell doesn’t have to be plain. In fact, a little flavor in the crust can quietly enhance the overall dessert. For this earl grey panna cotta tart, I sometimes add a whisper of lemon zest to echo the bergamot in the tea, or even a hint of vanilla bean for warmth. If you want to lean into herbal notes, finely chopped rosemary works beautifully—it’s the same fresh, fragrant element that makes shortbread cookies shine.
The crust should support the panna cotta without stealing the spotlight. It’s a supporting actor, not the lead role, but a good supporting actor can make the lead look even better.
A well-made tart shell is more than a container—it’s the stage on which your panna cotta gets to shine. Once you’ve baked and cooled it, the real magic happens in the next step: assembling and setting the tart for that perfect, photo-worthy finish.
Assembling & Setting the Tart
Timing Matters for the Perfect Set
Getting the set just right is a balance between patience and precision. Pour the warm panna cotta mixture into the cooled tart shell only after it’s reached a safe, just-above-room-temperature warmth. If it’s too hot, it can make the crust soggy; too cold, and it may start to set unevenly.
Once filled, place the tart on a level shelf in your refrigerator. I find that at least four hours of chilling gives the panna cotta enough time to firm without becoming too dense. For an evening dessert, I like to prepare the tart in the morning, so it’s perfectly set and ready to serve by dinner.
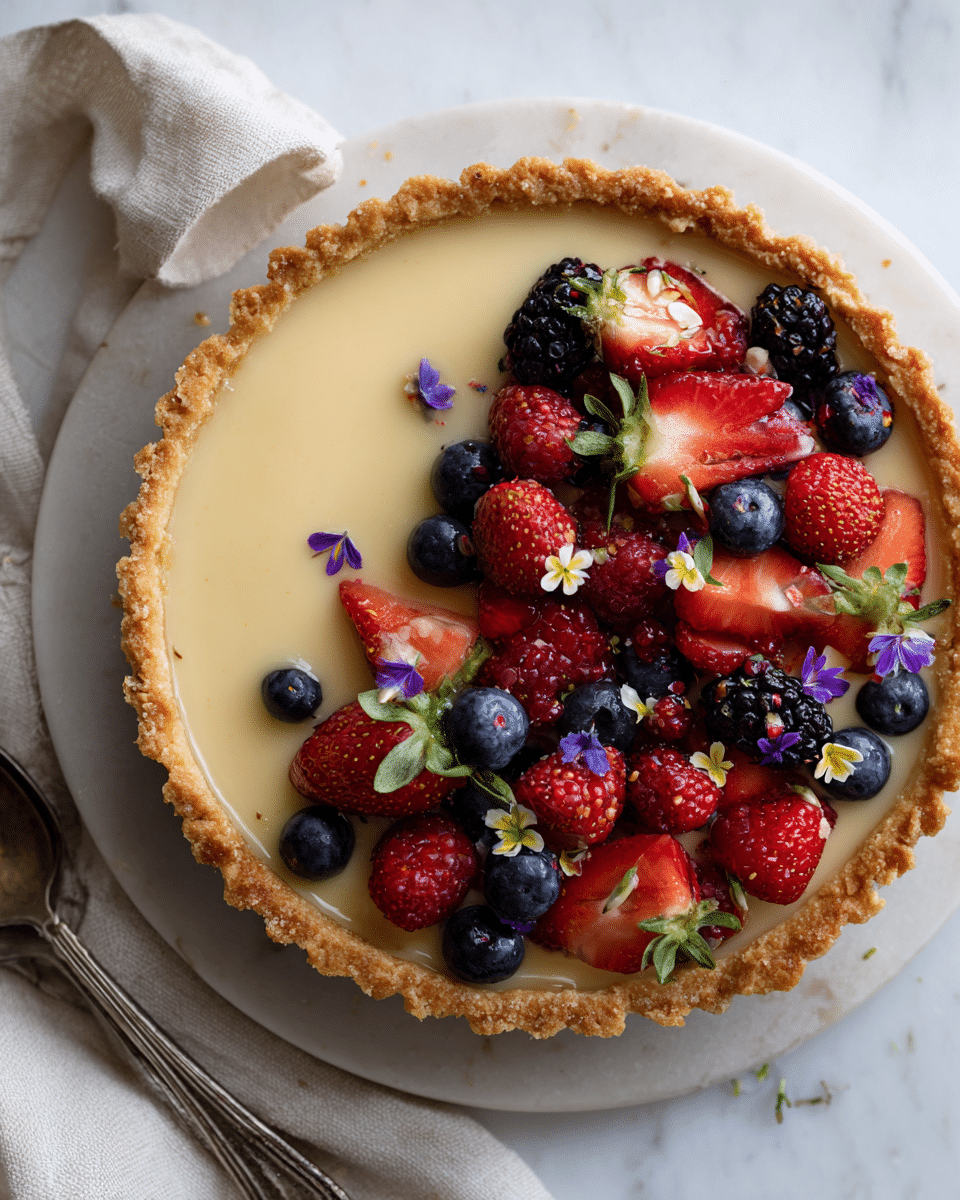
Garnishing for Texture and Color
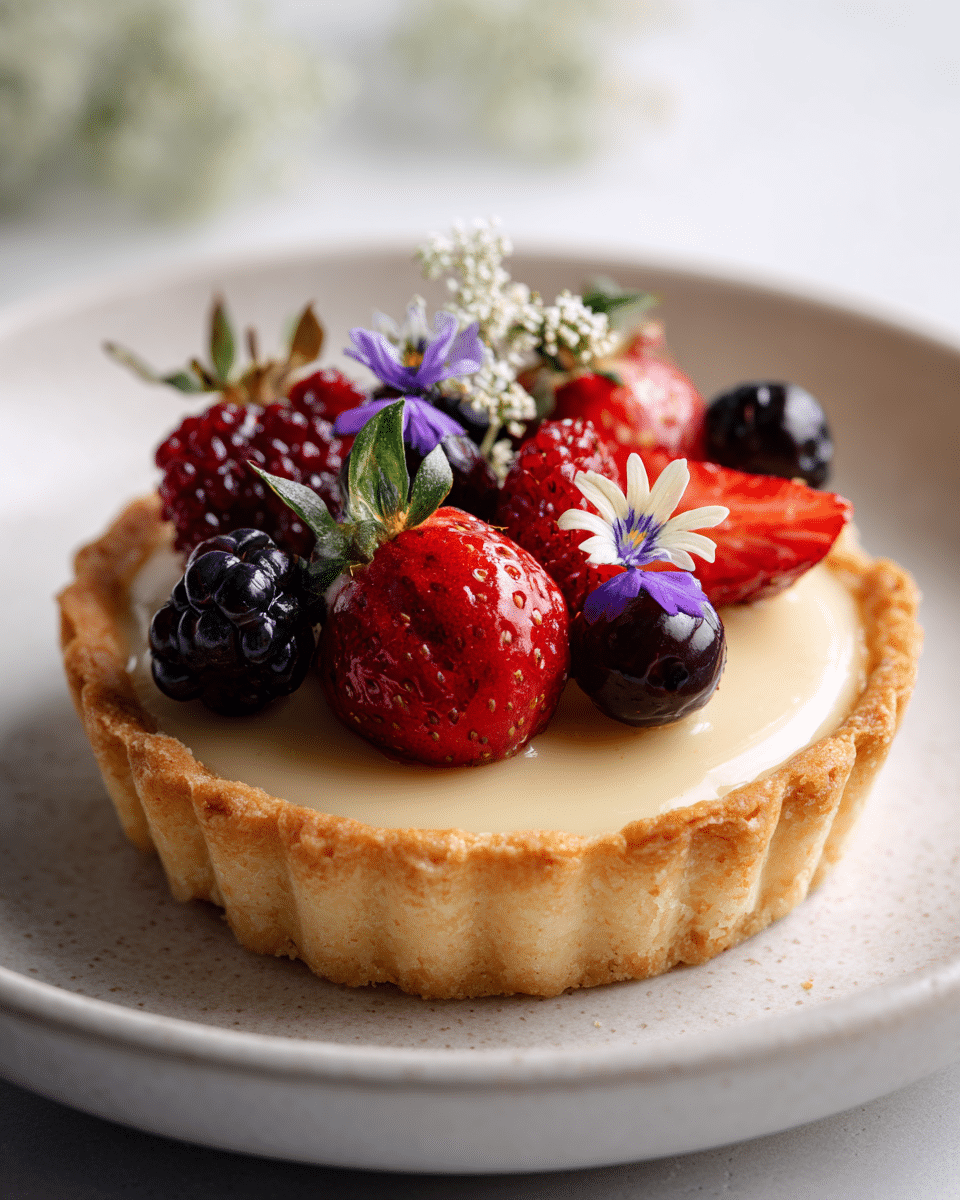
A panna cotta tart is a blank canvas, and garnishes are your brushstrokes. I often top mine with fresh berries, a few sprigs of edible flowers, or even a drizzle of caramel for depth. The contrast between the pale, creamy surface and vibrant garnishes makes the dessert visually irresistible.
Presentation isn’t just about looks—it sets expectations before the first bite. When guests see that glossy cream crowned with fresh fruit or petals, they’re already anticipating something special. The trick is to keep it elegant but simple, letting the earl grey aroma and silky texture remain the star of the show.
Why Is My Panna Cotta Rubbery?
Rubbery panna cotta almost always comes from too much gelatin or uneven mixing. If the gelatin doesn’t fully dissolve before chilling, you’ll get lumps or an overly firm set. I recommend weighing your gelatin instead of using volume measurements and letting it bloom in cold milk before gently heating it.
How to Know If Panna Cotta Is Bad?
Fresh panna cotta should smell clean and creamy, with no sourness. If the surface looks watery, feels sticky, or smells off, it’s time to toss it. Because panna cotta is dairy-based, even a slight change in scent can mean spoilage. I always store mine covered, which prevents it from absorbing fridge odors and keeps the surface smooth.
How Long Will Panna Cotta Keep?
A well-covered panna cotta tart will keep for up to three days in the refrigerator. After that, the texture starts to break down, and the crust may soften. If you need to make it ahead, consider preparing the panna cotta filling and tart shell separately, then assembling them the day you plan to serve.
How Do You Know When Panna Cotta Is Set?
The perfect panna cotta should tremble slightly when you jiggle the tart, holding its shape without collapsing. It shouldn’t be stiff—think of it as a cream that just decided to stand up. In my kitchen, a minimum of four hours of chilling works for an 8–9-inch tart, though overnight resting produces the most consistent results.
Troubleshooting panna cotta is all about small adjustments—measuring precisely, handling ingredients gently, and giving the dessert enough time to set properly. Once you master those, your earl grey panna cotta tart will be consistently silky, fragrant, and ready to impress.
Creative Twists & Serving Ideas
Seasonal Variations
One of the joys of panna cotta is how adaptable it is. In autumn, you can swap earl grey for chai tea, adding warm notes of cinnamon, cardamom, and cloves. For spring, green tea panna cotta with jasmine flowers makes a delicate alternative. In summer, I’ve even steeped hibiscus for a tangy, ruby-colored filling.
Floral pairings also work beautifully. A touch of rose water or crushed pistachios on top gives a Middle Eastern flair, similar to the elegant flavor balance in my Rococo Style Cake with Pistachio and Rose. Each variation brings a new mood to the same silky base, so you can make the tart feel fresh for every season.
Pairing Your Tart with Drinks
Serving the right drink alongside your tart can elevate the experience. An earl grey latte with foamy milk mirrors the dessert’s flavors and creates a cozy, unified finish. For special occasions, a glass of sparkling wine or Moscato adds a celebratory note without overpowering the tart’s subtlety.
Whether you’re leaning into seasonal flavors or pairing your panna cotta tart with the perfect sip, these small touches can turn a simple dessert into an unforgettable finale to any meal.
Conclusion
The earl grey panna cotta tart is more than just a dessert—it’s a moment. From the delicate aroma of bergamot-infused cream to the crisp bite of buttery pastry, every element works together to create something elegant yet comforting. It’s a recipe that invites small rituals: steeping the tea just right, waiting for the panna cotta to set, adding the perfect garnish. Whether you serve it at a dinner party or enjoy a quiet slice with tea on a Sunday afternoon, it’s a treat that feels special without being fussy. Once you’ve mastered the base, the possibilities for seasonal twists and pairings are endless.
Craving more edible art? Follow my culinary adventures on Facebook and save your next masterpiece on Pinterest!
Print
Earl Grey Panna Cotta Tart – Silky, Elegant, and Irresistible
- Total Time: 4 hours 55 mins
- Yield: 8 servings
- Diet: Vegetarian
Description
A silky earl grey panna cotta tart with buttery crust and fragrant cream – an elegant dessert you can make at home.
Ingredients
1 1/4 cups heavy cream
1 1/4 cups whole milk
2 tsp earl grey tea leaves
1/2 cup granulated sugar
2 tsp powdered gelatin
1 1/4 cups all-purpose flour
1/2 cup unsalted butter, chilled and cubed
1/4 cup powdered sugar
1 large egg yolk
Pinch of salt
Instructions
1. Bloom gelatin in cold milk for 5 minutes.
2. Heat cream with sugar until warm, then add tea leaves to steep for 5 minutes.
3. Strain cream and stir in gelatin until dissolved.
4. Make tart dough, chill for 30 minutes, then roll out and place in tart pan.
5. Blind-bake shell at 350°F (175°C) until golden; cool completely.
6. Pour panna cotta into shell and chill for at least 4 hours.
7. Garnish with berries or edible flowers before serving.
Notes
Steep tea for only 3 minutes if you prefer a lighter flavor.
Best served within 3 days for the freshest texture.
- Prep Time: 30 mins
- Cook Time: 25 mins
- Category: Dessert
- Method: No-Bake with Baked Shell
- Cuisine: Fusion