
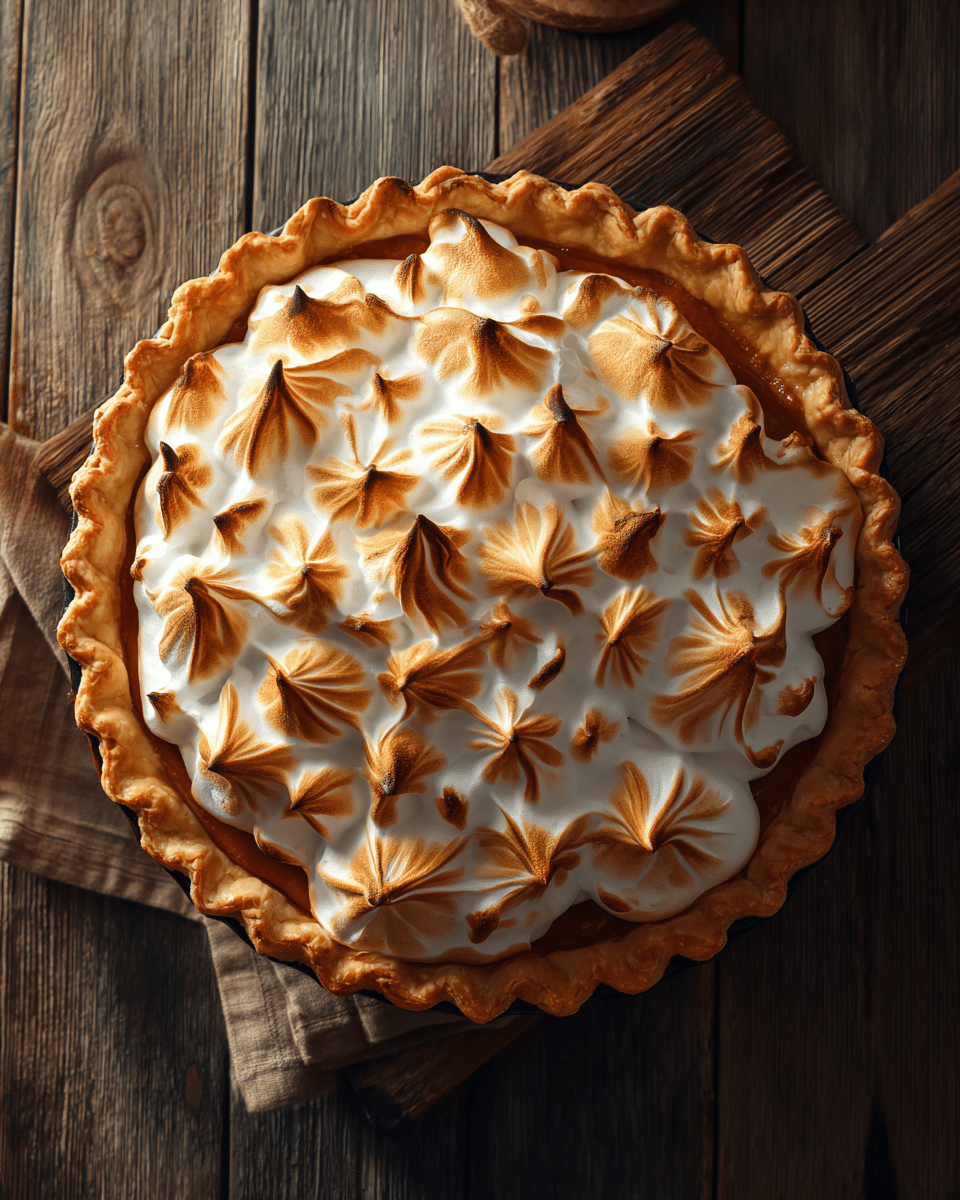
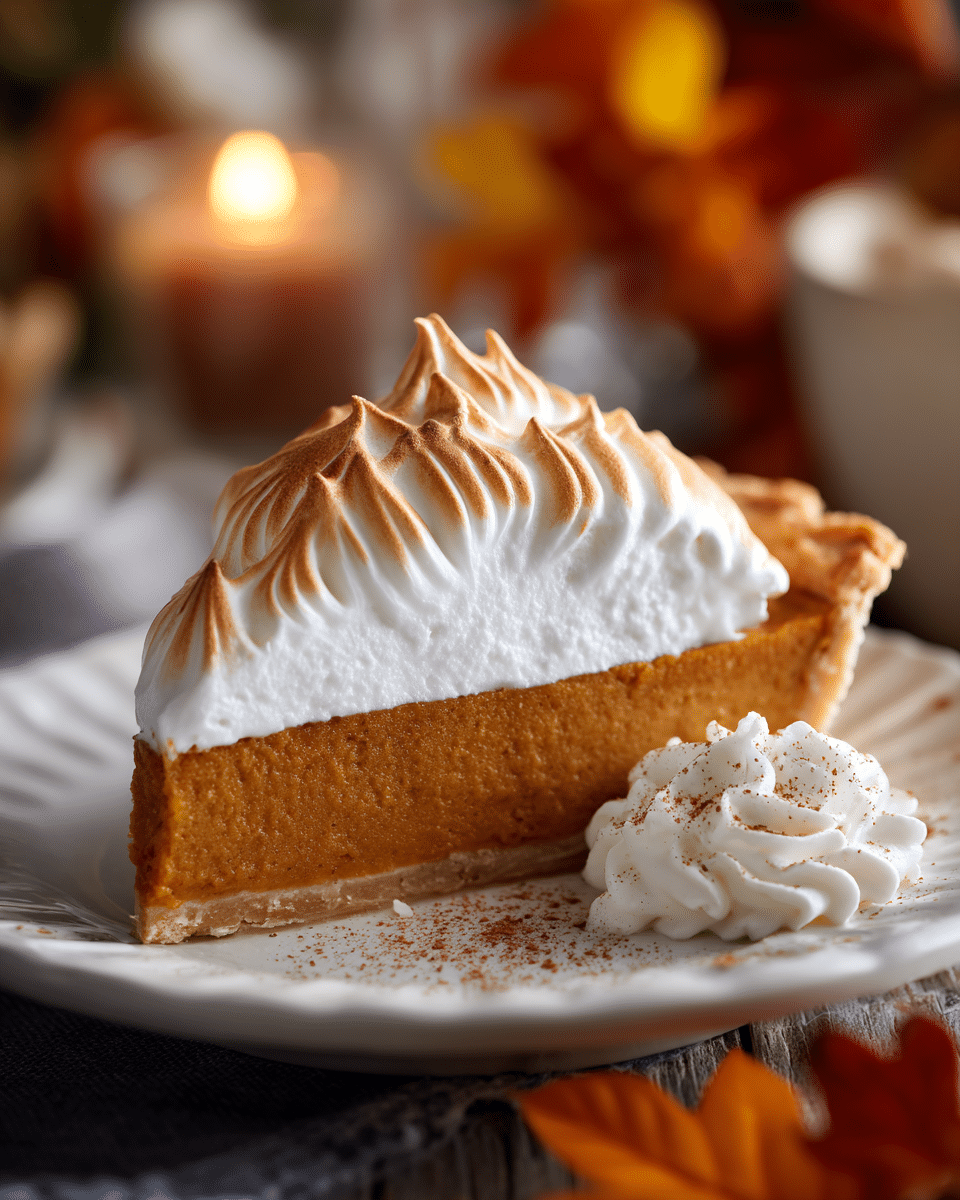
A fluffy meringue-topped sweet potato pie is more than just a dessert — it’s a nostalgic centerpiece that brings comfort, warmth, and a touch of elegance to any gathering. With its creamy, spiced sweet potato filling, flaky golden crust, and cloud-like meringue topping, this pie delivers a beautiful balance of texture and flavor.
But achieving that perfect bake isn’t always easy. From soggy crusts to weeping meringue, there are plenty of pitfalls. That’s why this guide walks you through every step: choosing the right ingredients, mastering blind baking, whipping up a stable meringue, and ensuring your pie slices like a dream.
👉 Looking for more dessert inspiration? Try this irresistible Modern Ambrosia Salad with Rosewater & Pistachios.
Whether it’s Thanksgiving, a Sunday dinner, or a cozy weekend treat, this sweet potato pie recipe will earn its place in your go-to collection.
Quick Navigation
Must-Have Ingredients for the Perfect Sweet Potato Pie
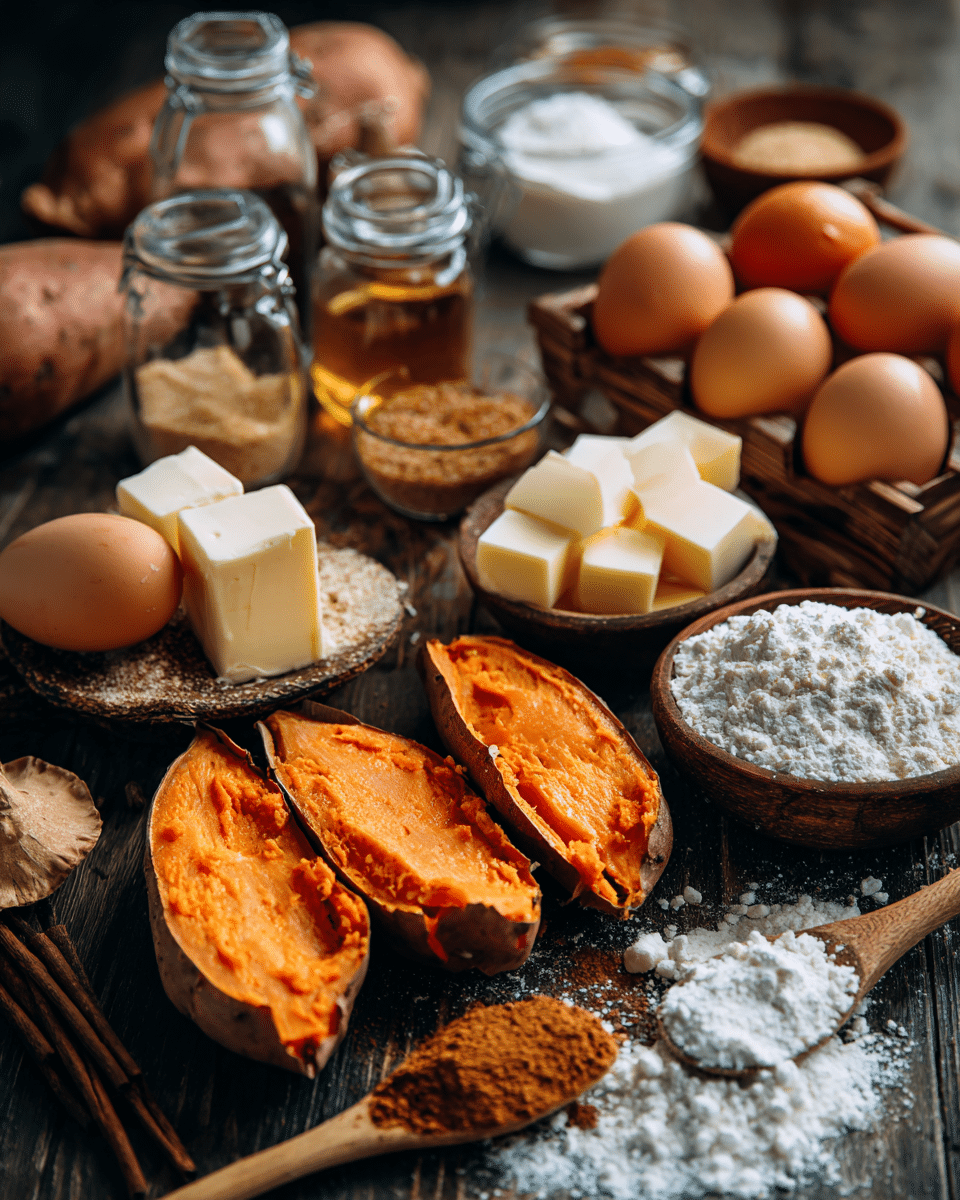
Creating a show-stopping fluffy meringue-topped sweet potato pie begins with what you put into it. Quality ingredients don’t just make a difference — they define the entire pie. From the earthy richness of the sweet potatoes to the cloud-like lift of the meringue, here’s what you need to get it right.
What You Need for a Fluffy Meringue Topping
The meringue is the crown of your pie — and it demands precision. You’ll need four room-temperature egg whites, which whip better than cold ones. A pinch of cream of tartar adds stability, helping the meringue hold its peaks. Gradually whisk in granulated sugar until the mixture turns glossy and forms stiff peaks. Finish with a splash of vanilla extract for that warm, aromatic finish.
To ensure your meringue doesn’t shrink or weep, always spread it over the pie while the filling is still warm. And don’t forget to seal the meringue right up to the crust to lock everything in place.
Choosing the Right Sweet Potatoes for Rich Flavor and Texture
Not all sweet potatoes are created equal. For the creamiest filling, go for orange-fleshed sweet potatoes — sometimes labeled as yams in the U.S. These are moist, sweet, and mash into a smooth consistency that gives your pie its signature silkiness.
Roasting the sweet potatoes intensifies their natural sweetness and reduces excess moisture, unlike boiling, which can waterlog the flesh. Once roasted, scoop out the flesh and mash it thoroughly — a few lumps are okay, but smoother is better.
You’ll also need unsalted butter, granulated and brown sugar, eggs, whole milk, and just the right touch of ground cinnamon and nutmeg. Together, these ingredients build the body and depth of your filling.
👉 Want a shortcut? Check out this Apple Cranberry Galette that’s perfect for individual servings and holiday platters.
Crafting the Flakiest Homemade Pie Crust
A fluffy meringue-topped sweet potato pie is only as good as the foundation it sits on — and that means getting the crust just right. A tender, flaky pie crust not only holds the filling, but adds a buttery contrast that makes every bite unforgettable.
The Secret to a Buttery, Flaky Base
The key to a flawless crust is keeping your fats cold. Use frozen unsalted butter and chilled vegetable shortening — this combination creates layers of flake and richness. Cube the butter and work it into the flour just until you have pea-sized bits; don’t overmix. This ensures your crust isn’t tough.
Add ice-cold water, a pinch of salt, and a touch of sugar to bring the dough together. Once formed, wrap it and let it chill for at least 30 minutes. Cold dough shrinks less, handles better, and bakes evenly.
When you roll it out, aim for a 1/8-inch thickness and gently fit it into your 9-inch pie dish without stretching. Poke the bottom with a fork to prevent bubbling, and place the crust back in the freezer before blind baking.
Why Blind Baking Prevents a Soggy Bottom
Blind baking is your insurance policy against sogginess. Before adding any filling, line your chilled crust with foil or parchment and fill it with pie weights or dried beans. Bake at 375°F (190°C) for about 15 minutes — just long enough to set the structure.
Remove the weights and bake another 5 minutes to lightly brown the base. This extra step keeps your crust crisp, even under a moist sweet potato filling.
Making the Sweet Potato Filling Like a Pro
The heart of every fluffy meringue-topped sweet potato pie lies in its filling — rich, creamy, and loaded with flavor. When done right, it melts in your mouth and leaves that perfect hint of spice. Here’s how to make it unforgettable.
Roasting vs. Boiling: Why It Matters
While boiling sweet potatoes is faster, it can leave your filling watery and bland. Roasting, on the other hand, draws out natural sugars and deepens flavor. Simply pierce the skins and roast at 400°F (204°C) for about 45 minutes, or until they’re fork-tender.
Once cool, peel and mash them until smooth. You can use a fork, potato masher, or even a food processor if you want a silkier texture. If you’re prepping ahead, store the mashed potatoes in an airtight container in the fridge for up to two days.
Balancing Sweetness, Spice, and Texture
For the ideal filling, combine your roasted sweet potatoes with unsalted butter, granulated sugar, brown sugar, and a touch of milk for creaminess. Crack in two room-temperature eggs — they help bind everything while adding richness.
Spice it up with ground cinnamon, nutmeg, and a pinch of salt. A teaspoon of pure vanilla extract adds warmth that ties the whole flavor profile together.
Mix everything until velvety smooth. Taste the filling before it goes into the crust — this is your moment to adjust sweetness or spice to your liking.
Baking the Pie to Silky Perfection
Now that your crust is crisp and your filling is ready, it’s time to bring it all together. The baking step is where your fluffy meringue-topped sweet potato pie transforms into the showpiece it’s meant to be — but it’s also where many pies go wrong. Here’s how to bake it right.
How to Know When Your Pie Is Perfectly Set
Pour the prepared filling into your pre-baked crust and use a spatula to smooth the top evenly. Bake the pie at 375°F (190°C) for about 50 minutes. Don’t rush this part — sweet potato filling needs time to set gently.
You’ll know it’s ready when the center is mostly set with just a slight wobble. A toothpick inserted near the center should come out mostly clean. If the crust starts browning too quickly, lightly tent the edges with foil or use a pie shield.
Once baked, let the pie cool completely at room temperature. This step is crucial. Cutting into a warm pie will destroy the texture and cause the filling to ooze.
Troubleshooting Overbaking and Underbaking
If the filling cracks or looks dry, it’s likely overbaked. On the other hand, if it’s too jiggly or soft after cooling, it may need a few extra minutes in the oven. Keep in mind that the filling continues to cook slightly as it cools, so don’t wait for it to be fully solid in the oven.
👉 Love mastering the art of baking? This guide to perfect Cranberry Pistachio Cookies breaks it down with visuals and timing tips.
Creating a Stable, Pillowy Meringue
A silky filling and crisp crust set the stage, but the meringue steals the spotlight. Light as air and slightly toasted, the meringue should hold its shape without weeping or collapsing. Here’s how to whip up a cloud-like topping that won’t let you down.
Step-by-Step: How to Whip Meringue That Holds Its Peaks
Use room-temperature egg whites — they whip faster and more fully than cold ones. Add cream of tartar early on to help stabilize the structure. Begin whipping on medium speed until foamy, then gradually increase to high.
Slowly add sugar, one tablespoon at a time. Rushing this step will result in gritty meringue. Continue whipping until stiff peaks form — they should stand tall when you lift the beater and look glossy, not dry or frothy.
Here’s a quick visual guide:
| Meringue Stage | Description | How to Test |
|---|---|---|
| Soft peaks | Tips curl slightly | Inverted whisk forms gentle curve |
| Stiff peaks | Stand straight, glossy finish | Tip stands firm when lifted |
Why Timing and Temperature Matter
Meringue should be spread onto the pie while the filling is still warm. This helps the bottom of the meringue begin cooking from underneath, sealing the layers and reducing the risk of separation or “weeping.”
Make sure the meringue touches the edges of the crust all the way around — this prevents it from shrinking and creates a beautiful seal.
Toasting the Meringue Without Burning It
Once your pie is topped with that beautiful, billowy meringue, there’s one final touch — toasting. This step adds flavor, texture, and the golden peaks that make your fluffy meringue-topped sweet potato pie look like it came from a bakery window.
Torching vs. Broiling: Which Method is Best?
There are two main ways to toast meringue:
| Method | Pros | Cons |
|---|---|---|
| Kitchen torch | Precision control, quick browning | Requires extra tool, can over-toast spots |
| Broiler | Even browning, no extra equipment | Risk of burning, must watch closely |
A kitchen torch gives you more control — simply sweep it over the peaks until they’re golden brown. Be patient and keep the flame moving to avoid scorching.
The oven broiler is a great alternative. Place the pie on a rack close to the heat and watch carefully. It only takes 1 to 2 minutes to toast — any longer and your meringue might burn.
Final Touches and Cooling Tips
Once toasted, let the pie cool completely at room temperature. This helps the meringue “set” and prevents condensation. Never cover or refrigerate the pie while the meringue is still warm, as this can lead to weeping or deflation.
Cooling and Setting for Sliceable Results
Even the most gorgeous fluffy meringue-topped sweet potato pie needs time to settle. Rushing the cooling process is one of the biggest mistakes bakers make — and it often leads to sloppy slices, runny filling, or a weepy topping.
Why You Should Never Skip the Cooling Step
After baking and toasting, your pie needs to cool completely at room temperature. This allows the filling to firm up and the meringue to stabilize. Cutting too soon will cause the filling to ooze and the structure to collapse.
Let the pie rest on a wire rack for at least 3 to 4 hours. Avoid placing it in the refrigerator right away — sudden temperature changes can cause condensation, which leads to soggy crust and watery meringue.
How to Know When It’s Ready to Slice
The pie is ready to slice when the bottom of the dish feels cool to the touch, and the filling jiggles slightly but doesn’t ripple. Use a sharp, clean knife and wipe it between cuts for picture-perfect slices.
Common Mistakes and How to Avoid Them
Making a fluffy meringue-topped sweet potato pie isn’t difficult — but there are some sneaky mistakes that can ruin the texture, flavor, or appearance of your pie. Here are the most common issues, and how to prevent them like a pro.
Mistake #1: Using Watery or Overcooked Sweet Potatoes
Boiling sweet potatoes often leads to excess moisture, which can make your filling too loose or soggy. Roasting helps concentrate flavor and maintain structure.
Fix: Always roast the potatoes, and allow them to cool before mixing. If the mash seems too wet, drain off excess liquid or pat dry with a paper towel.
Mistake #2: Underbaking or Overbaking the Filling
It’s tempting to pull the pie out too early, or leave it in a few minutes too long — both can ruin the final result. Underbaking causes runny filling; overbaking leads to cracks and dryness.
Fix: Bake until the center has just a gentle wobble. Check at the 45-minute mark, and shield the crust if it browns too quickly.
Mistake #3: Weeping or Shrinking Meringue
Meringue can “weep” — releasing water between the topping and filling — if it’s not sealed properly or if it’s added to a cool pie.
Fix: Always add meringue to a warm filling, and make sure it touches the crust all around. This creates a proper seal and helps it set beautifully.
Serving Suggestions and Delicious Variations
After all the effort that goes into making a fluffy meringue-topped sweet potato pie, presenting and customizing it just right makes the experience complete. Whether you’re serving a crowd or making it your signature holiday dish, here are ways to elevate the moment.
How to Serve It Like a Showstopper
Serve your pie at room temperature for the smoothest texture and best flavor. A clean, hot knife (run under hot water and wiped between slices) gives you those clean, café-style cuts. For a festive touch, garnish each slice with a dusting of cinnamon, a dollop of whipped cream, or a sprinkle of crushed pecans on the side.
Pair with coffee, chai tea, or a dessert wine like Muscat to complement the spiced, earthy flavors.
Creative Twists on the Classic Recipe
Want to give your pie a signature flair? Try one of these ideas:
- Gluten-Free Crust: Use almond flour or a gluten-free all-purpose blend for the base.
- Coconut Milk Swap: Replace regular milk with full-fat coconut milk for a subtle tropical vibe.
- Add Toasted Pecans: Mix chopped pecans into the filling or sprinkle them under the meringue for crunch.
- Maple Sweetness: Swap part of the brown sugar for pure maple syrup for a deeper, caramel-like flavor.
👉 Looking for something even more indulgent? Try this Cranberry Pistachio Cookies — it’s perfect for grown-up gatherings.
Conclusion
A fluffy meringue-topped sweet potato pie is more than just a dessert — it’s a celebration of texture, tradition, and flavor. From its velvety roasted sweet potato filling to the billowing, golden meringue topping, every layer plays a part in making this pie unforgettable.
Whether you’re baking for a holiday gathering, impressing guests, or simply treating yourself, following the right techniques makes all the difference. Remember: roast your sweet potatoes, blind bake your crust, whip your meringue to stiff peaks, and let your pie cool completely.
Frequently Asked Questions
What are some common mistakes when making sweet potato pie?
Common mistakes include boiling the sweet potatoes instead of roasting them (which can make the filling watery), overmixing the filling (leading to a dense or rubbery texture), skipping blind baking (causing a soggy crust), and adding meringue to a cool filling (which can lead to weeping or shrinking).
Always use roasted sweet potatoes, measure accurately, and ensure your crust is pre-baked. Add the meringue while the filling is still warm and fully cooled before slicing for best results.
How to know if meringue on pie is done?
You’ll know your meringue is ready when the peaks are golden brown on top and firm, but still light and airy inside. The texture should be set and glossy, not grainy or runny. Use a kitchen torch for precision or broil briefly in the oven — just 1–2 minutes is usually enough.
Properly whipped meringue should form stiff peaks and cling to the pie crust edges to prevent shrinking.
How long can sweet potato pie sit out?
Sweet potato pie with meringue topping should not sit out for more than 2 hours at room temperature. Since it contains both eggs and dairy, bacteria can develop if left unrefrigerated too long.
Once the pie has cooled fully, transfer it to the fridge if not serving immediately. For food safety, always store leftovers properly.
How to store a pie with meringue topping?
Once cooled completely, loosely cover the pie with plastic wrap or foil and refrigerate. Meringue-topped pies are best enjoyed within 2 to 3 days, as the meringue may begin to soften or “weep” over time.
For longer storage, freeze the pie without the meringue, then add and toast the meringue fresh when ready to serve. Never freeze a fully meringue-topped pie — the texture won’t survive thawing well.
Craving more edible art? Follow my culinary adventures on Facebook and save your next masterpiece on Pinterest!
How to Make a Fluffy Meringue-Topped Sweet Potato Pie
Ingredients
For the Crust:
- 12 tablespoons 170 grams unsalted butter, frozen
- 3 cups 360 grams all-purpose flour
- 1 teaspoon salt
- 1 tablespoon sugar
- 1/3 cup 62 grams vegetable shortening, frozen
- 6 tablespoons very cold water
- 1 egg
- 1 tablespoon coarse sugar
For the Filling:
- 1 pie crust
- 1 pound 454 grams sweet potatoes (about 2 medium)
- 1/2 cup 226 grams unsalted butter, room temperature
- 1/2 cup 50 grams granulated sugar
- 1/2 cup 107 grams brown sugar
- 2 large eggs room temperature
- 1 teaspoon vanilla extract
- 1/2 teaspoon ground cinnamon
- 1/4 teaspoon ground nutmeg
- Pinch of salt
- 1/4 cup 57 grams milk
For the Meringue:
- 4 large egg whites room temperature
- 1/2 cup 50 grams granulated sugar
- 1/4 teaspoon cream of tartar
- 1/2 teaspoon vanilla extract
Instructions
- 1. Prepare the pie crust by mixing frozen butter and shortening into flour. Add water, sugar, salt, and form dough. Chill before rolling.
- 2. Roll out dough into a 9-inch pie dish. Poke base with fork. Freeze until ready to bake.
- 3. Preheat oven to 375°F (190°C).
- 4. Blind bake crust for 10–15 minutes with foil and pie weights. Remove weights and cool.
- 5. Roast sweet potatoes at 400°F (204°C) until fork tender, about 45 minutes. Scoop flesh, mash smooth.
- 6. Combine mashed sweet potatoes with butter, sugars, eggs, vanilla, cinnamon, nutmeg, salt, and milk. Mix until creamy.
- 7. Pour filling into crust. Bake 50 minutes until mostly set. Tent edges if browning too quickly. Cool completely.
- 8. Beat egg whites with cream of tartar until soft peaks form. Gradually add sugar, whip to stiff glossy peaks. Fold in vanilla.
- 9. Spread meringue over warm pie, sealing edges. Torch or broil until golden brown. Cool before slicing.
1 thought on “How to Make a Fluffy Meringue-Topped Sweet Potato Pie”