
Introduction
Homemade chili crisp is the one condiment I never want to run out of. After trying every store-bought version I could find, I started experimenting in my own kitchen—and never looked back. Making it at home gave me full control over the flavor, heat, and crunch I love.
What makes it special? It’s not just spicy—it’s crispy, garlicky, deeply savory, and full of personality. A spoonful can transform anything from noodles to eggs.
Ready to make this masterpiece yourself? The full, printable recipe is waiting for you. 👉The Ultimate Guide to Warm Cheese Appetizers.
In this guide, I’ll show you exactly how to make your own version from scratch, plus how to use it in creative, mouthwatering ways.
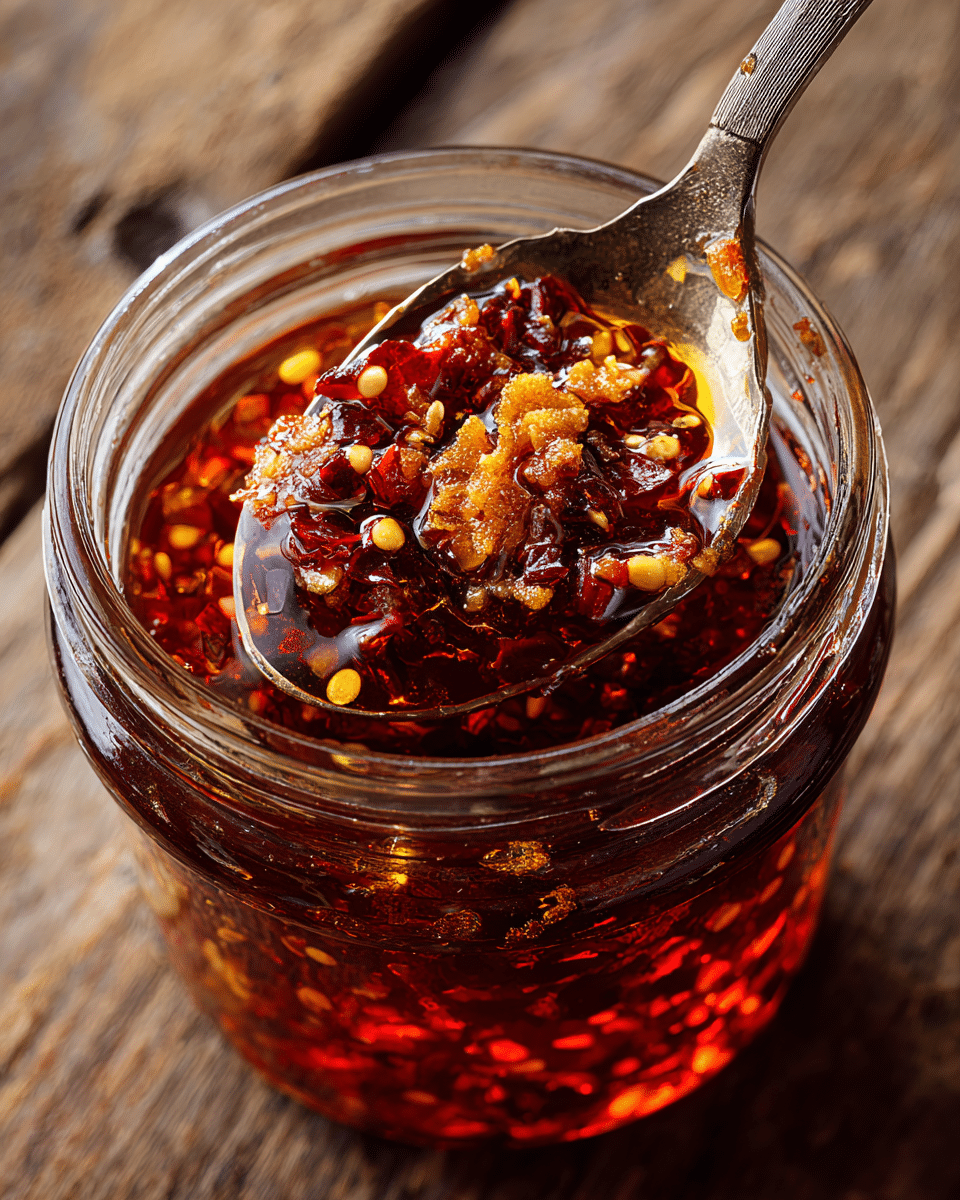
Table of Contents
What is Homemade Chili Crisp?
The History Behind Chili Crisp: A Global Spicy Sensation
Homemade chili crisp may feel like a trendy condiment now, but it has deep roots in traditional Chinese cooking. Originating in Sichuan cuisine, chili oil was first created to deliver that signature mala flavor—a spicy, numbing sensation from chili peppers and Sichuan peppercorns. Over time, cooks began adding crispy aromatics like garlic, shallots, and fermented soybeans to give it extra depth and texture. That evolution gave birth to what we now know as chili crisp.
Today, chili crisp is a global pantry staple. It’s used in everything from Asian stir-fries to fusion dishes across American home kitchens. But despite its popularity, nothing beats the flavor of a well-made homemade version—customized to your heat level, crunch, and favorite spices.
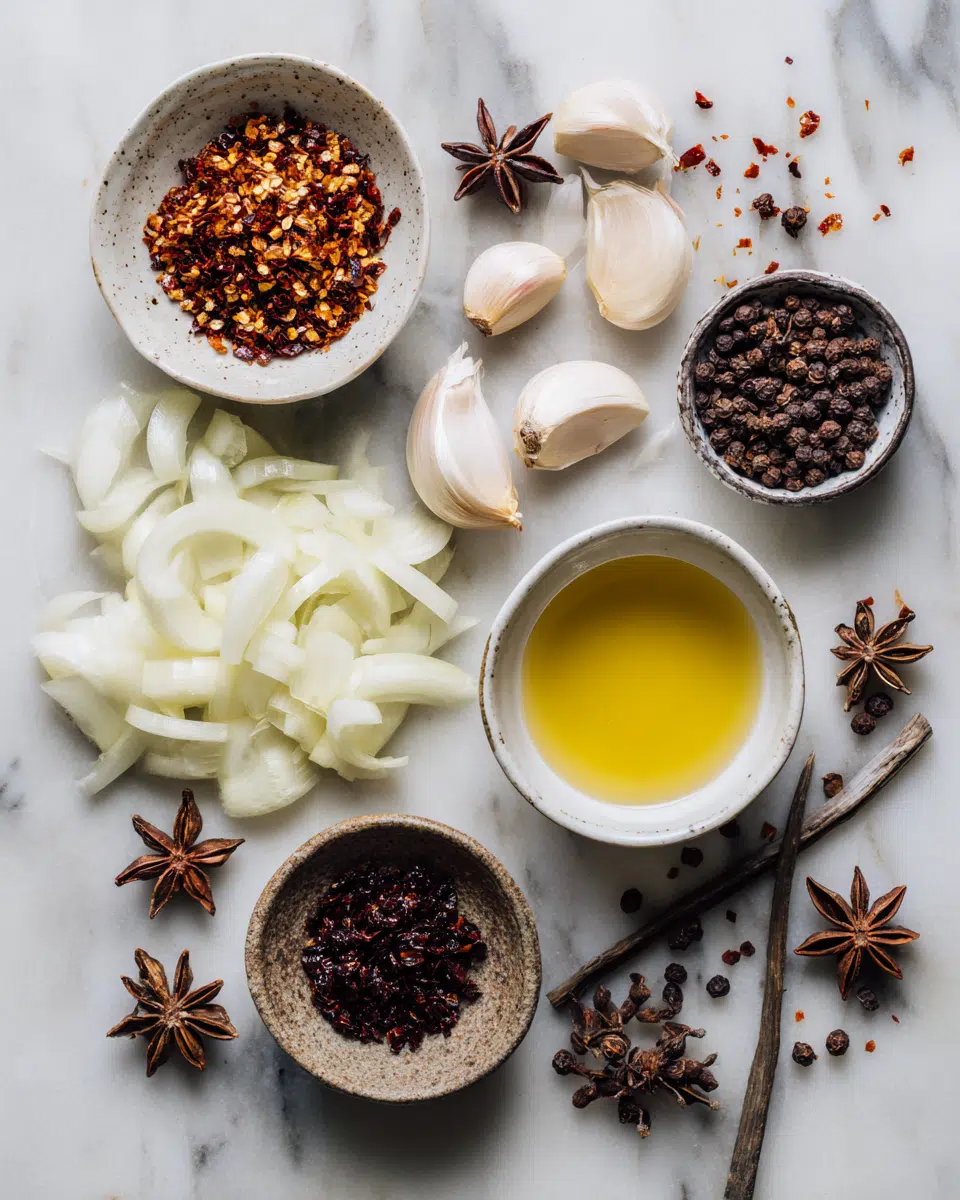
Key Ingredients That Define Homemade Chili Crisp
What makes chili crisp different from regular chili oil? It’s all about the crisp—the golden bits suspended in the oil that deliver texture, aroma, and flavor in every bite. Here’s what you’ll typically find in a homemade batch:
- Neutral oil like canola, avocado, or grapeseed to carry the flavor
- Dried chili flakes (like Korean gochugaru or Chinese chili flakes) for balanced heat
- Garlic and shallots, thinly sliced and fried to a golden crisp
- Spices such as star anise, cinnamon, or bay leaf for warmth
- Soy sauce or fermented black beans for a rich umami kick
These ingredients combine to create something that’s not just spicy—but deeply satisfying and endlessly versatile.
Why Make Your Own Chili Crisp?
Benefits Over Store-Bought Brands
Making your own homemade chili crisp isn’t just a fun kitchen project—it’s a game changer. Store-bought brands are convenient, but they often come with compromises: excess oil, preservatives, artificial flavor enhancers, or lack of real crunch. When you make it yourself, you take back control.
Here’s what you gain by going homemade:
- Freshness: You’re using fresh garlic, real spices, and high-quality oil—no mystery ingredients.
- Customization: Adjust the heat level, sweetness, or crunch to suit your personal taste.
- No additives: Say goodbye to preservatives, MSG (unless you choose to add it), and stabilizers.
- Better texture: Homemade versions have a livelier crunch and deeper flavor layers.
Homemade chili crisp also costs less per serving and gives you a better return on your ingredients, especially if you cook often.
Controlling Flavor, Heat, and Quality at Home
One of the best things about making chili crisp at home is how flexible it is. Don’t like it too spicy? Use milder chili flakes like gochugaru. Want more of that deep, smoky umami? Add fermented black beans or mushroom powder.
You also choose the oil: avocado oil for a buttery base, peanut oil for a nutty edge, or grapeseed for something neutral. Every component can be adjusted to build your ideal flavor profile.
And let’s talk about crunch. Store-bought versions often sit on shelves for months. Homemade chili crisp stays crisp, aromatic, and alive—especially when made fresh and stored correctly.
This isn’t just a recipe; it’s a magic trick. Watch how we transform a simple vegetable into a stunning, restaurant-worthy centerpiece that will leave everyone speechless 👉Upside-Down Puff Pastry Tart.
Ingredients Breakdown
Best Oils, Peppers, and Aromatics to Use
The beauty of homemade chili crisp is that every ingredient adds a layer of flavor, crunch, or aroma. Getting the right base is key to making a version that’s better than anything you can buy.
Here’s what to consider:
Oils:
Choose a neutral, high smoke-point oil to avoid bitterness and ensure all ingredients fry evenly.
| Oil Type | Flavor Profile | Smoke Point |
|---|---|---|
| Avocado Oil | Buttery, mild | 520°F |
| Grapeseed Oil | Clean, neutral | 420°F |
| Peanut Oil | Lightly nutty | 450°F |
| Canola Oil | Very neutral | 400°F |
Avoid strong-tasting oils like olive oil or coconut oil—they overpower the spices.
Chili Flakes:
You need chili flakes that offer both heat and color. Here are good options:
- Gochugaru (Korean chili flakes): Mild, bright red, slightly sweet
- Sichuan chili flakes: Medium heat, aromatic, smoky
- Arbol or Thai chili flakes: Hotter, deep red, sharp flavor
For a layered flavor, combine two types: one for color, one for heat.
Aromatics:
These are what give chili crisp that addictive crunch and deep umami flavor.
- Garlic: Thinly sliced or minced, fried until golden
- Shallots: Sweeter and less sharp than onions, perfect for crunch
- Ginger: Optional, adds warmth and zing
- Star Anise, Bay Leaf, Cinnamon Stick: Infuse the oil with warmth and complexity
- Fermented black beans or dried mushrooms: Boosts umami
Spices That Take Your Chili Crisp to the Next Level
A truly unforgettable chili crisp has more than heat—it has layers of aroma and complexity. Here’s how to elevate yours:
- Sichuan Peppercorns: Numbing, citrusy bite that defines authentic versions
- Five Spice Powder: A sweet-savory blend that adds warmth
- MSG or mushroom powder: Optional, but adds real umami depth
- Sugar and Salt: Balance the flavors—don’t skip these
Your spice mix is what gives your chili crisp its signature character. Want it smoky? Add a touch of smoked paprika. Prefer it citrusy? Try dried lime zest.
Print
The Ultimate Guide to Homemade Chili Crisp (My Secret Recipe!)
- Total Time: 30 minutes
- Yield: 2 cups
- Diet: Vegan
Description
Bold, crispy, and deeply flavorful homemade chili crisp you can customize to your liking.
Ingredients
2 cups neutral oil (grapeseed, avocado, or canola)
1/4 cup garlic, thinly sliced
1/4 cup shallots, thinly sliced
2 tbsp ginger, minced (optional)
3 tbsp chili flakes (mixed: Sichuan, gochugaru, crushed red pepper)
1 tbsp soy sauce
1 tsp sugar
1/2 tsp salt
1 tsp Sichuan peppercorns
2 bay leaves
1 star anise
1 tbsp fermented black beans or mushroom powder (optional)
1/2 tsp MSG (optional)
Instructions
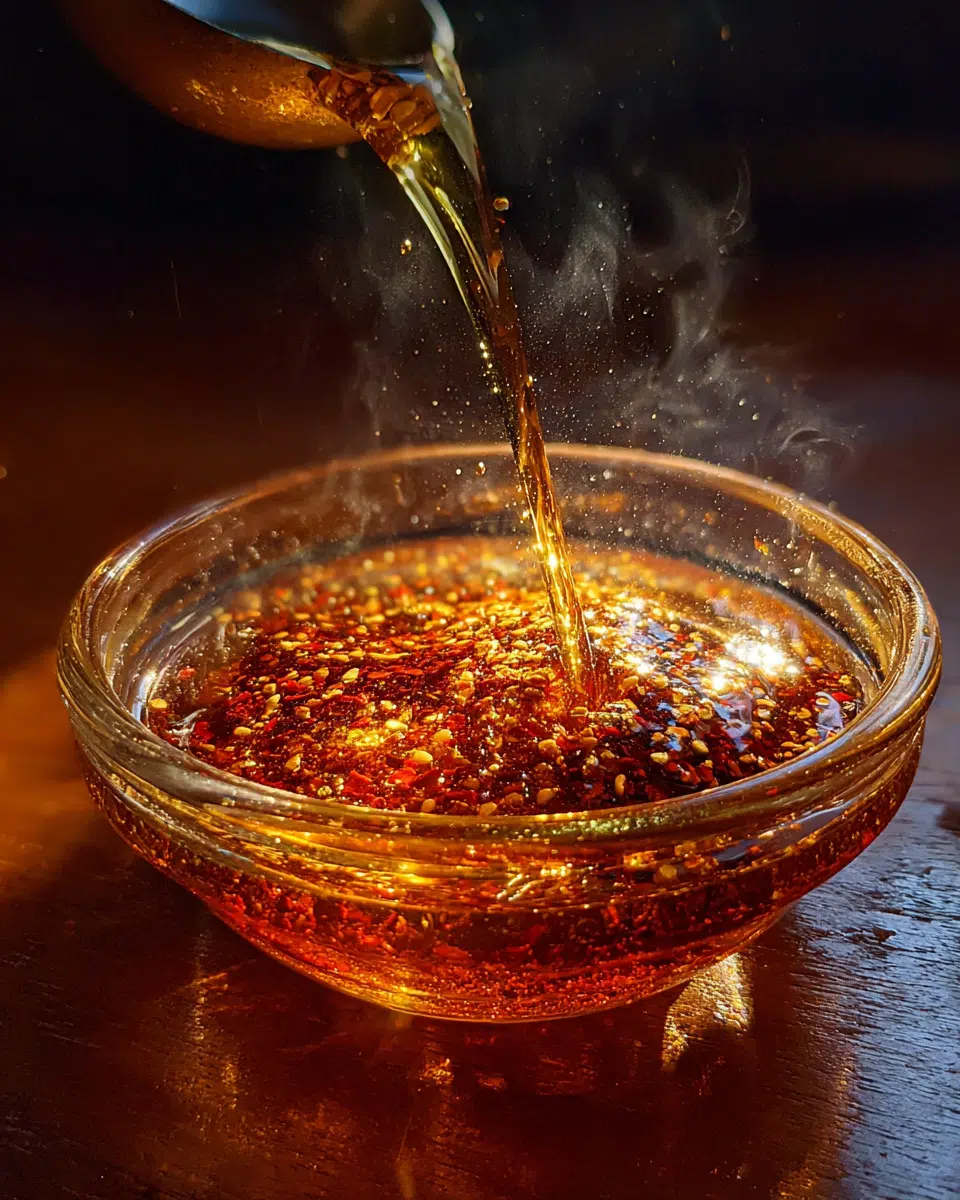
1. Heat oil in a saucepan with bay leaves, star anise, Sichuan peppercorns, and ginger on medium-low heat for 8–10 minutes.
2. Add garlic and shallots. Cook while stirring constantly until golden and crispy (8–12 minutes).
3. In a heatproof bowl, combine chili flakes, sugar, salt, MSG, fermented black beans, and soy sauce.
4. Strain hot oil into chili mixture carefully and mix.
5. Let the fried aromatics cool slightly, then stir into the bowl.
6. Let the mixture cool completely before transferring to a jar.
7. Store in a sealed container. Rest 12 hours before first use.
Notes
Use a thermometer to control oil temperature if desired.
Always use a clean spoon when serving from the jar.
Store in the refrigerator for longer shelf life.
- Prep Time: 15 minutes
- Cook Time: 15 minutes
- Category: Condiment
- Method: Stovetop
- Cuisine: Asian Fusion
My Secret Homemade Chili Crisp Recipe
Step-by-Step Instructions with Timing & Heat Control
Making homemade chili crisp is easier than you think, and once you’ve done it once, you’ll never want to go back to store-bought. Here’s my tried-and-true process that delivers perfectly crispy, spicy, and flavorful results every time.
Ingredients:
- 2 cups neutral oil (like grapeseed or avocado)
- 1/4 cup garlic, thinly sliced
- 1/4 cup shallots, thinly sliced
- 2 tbsp ginger, minced (optional)
- 3 tbsp Sichuan chili flakes
- 1 tbsp gochugaru (for color)
- 1 tsp crushed red pepper (for heat)
- 1 tbsp soy sauce
- 1 tsp sugar
- 1/2 tsp salt
- 1 tsp Sichuan peppercorns
- 2 bay leaves
- 1 star anise
- 1 tbsp fermented black beans or mushroom powder (optional)
- 1/2 tsp MSG (optional)
Equipment:
- Heavy-bottomed saucepan
- Fine mesh strainer or slotted spoon
- Heat-safe bowl or glass jar
Method:
- Infuse the oil:
In a saucepan, combine the oil, bay leaves, star anise, Sichuan peppercorns, and ginger. Heat on medium-low for about 8–10 minutes, allowing the oil to infuse without burning. - Fry the aromatics:
Add the garlic and shallots. Lower heat slightly if needed. Stir continuously and cook until golden and crispy—about 8–12 minutes. Watch carefully to avoid burning. - Prepare your chili bowl:
In a separate heat-proof bowl, combine chili flakes, crushed red pepper, gochugaru, fermented black beans (if using), sugar, salt, MSG, and soy sauce. - Strain and pour:
Once aromatics are golden, remove the pan from heat. Carefully strain the hot oil into the chili mixture. It will sizzle—this is where the magic happens. Mix gently. - Add the crisps:
Once the fried garlic and shallots have cooled slightly, stir them into the chili oil. Let the mixture cool completely. - Store:
Transfer to a clean jar. Seal tightly. Let it sit for at least 12 hours to allow flavors to develop before using.
Quick Notes:
- Adjust chili ratio to control heat.
- Use fresh garlic and shallots for max crunch.
- Don’t overheat oil—burnt garlic = bitter chili crisp.
Optional Add-ins for Your Signature Twist
Once you master the base recipe, it’s easy to create your own variations:
| Flavor Profile | Add-In Suggestions |
|---|---|
| Smoky | Smoked paprika, chipotle powder |
| Sweet-Savory | A drizzle of maple syrup or honey |
| Nutty | Crushed roasted peanuts or sesame |
| Tangy | Dried lime peel or a splash of vinegar |
This recipe is the foundation. From here, you can build a chili crisp that’s 100% yours—hotter, crunchier, or more complex.
Tools & Equipment You’ll Need
Kitchen Tools to Simplify the Process
Making homemade chili crisp doesn’t require fancy gadgets—but using the right tools makes a big difference in safety, flavor, and consistency. Here are the essentials I use in my own kitchen:
1. Heavy-Bottomed Saucepan
This is your most important tool. A small to medium heavy-bottomed pan ensures even heat distribution, so your oil doesn’t overheat or burn your aromatics.
2. Fine Mesh Strainer or Slotted Spoon
Once your oil is infused and your aromatics are fried, you’ll need to strain the hot oil into your spice mixture. A fine mesh strainer or a sturdy slotted spoon helps separate solids from oil cleanly, avoiding any bitter bits.
3. Heat-Proof Glass Bowl
Your chili flakes and spices go into a heat-safe bowl before the oil is poured in. It needs to withstand 300°F+ oil temperatures without cracking—glass or stainless steel is ideal.
4. Jar with Airtight Lid
Storage matters. Use a clean, dry glass jar with a tight seal to keep your chili crisp fresh and flavorful. Wide-mouth jars make scooping easier.
5. Digital Thermometer (Optional)
If you want extra control, use a thermometer to keep oil between 250°F and 300°F. This prevents burning while ensuring deep flavor infusion.
Safety Tips When Working With Hot Oil and Spices
Making chili crisp is safe if you follow basic precautions. Here’s what to keep in mind:
- Stay present: Never walk away while heating oil. It can go from infused to burned in seconds.
- Use low to medium heat: High heat increases the risk of burning garlic or starting a grease fire.
- Dry your ingredients: Moisture causes oil to splatter. Pat aromatics dry before adding them to the pan.
- Pour carefully: When adding hot oil to spices, do so slowly and from a safe distance.
Working with hot oil may sound intimidating, but with the right tools and attention, it’s straightforward and rewarding.
How to Store and Preserve Homemade Chili Crisp
Best Jars and Containers for Freshness
Once your homemade chili crisp is cooled and full of flavor, you’ll want to store it properly to keep it fresh and safe. The right container keeps the oil clear, the crisp crunchy, and the flavors alive.
Here’s what works best:
- Glass jars with airtight lids: Wide-mouth jars are easiest for scooping and pouring. Mason jars or repurposed sauce jars are perfect.
- Sterilized containers: Always wash your jar with hot soapy water, rinse well, and dry completely. For longer shelf life, sterilize in boiling water and let cool before use.
- Avoid plastic: Oil can absorb flavors from plastic, and strong spices may stain it. Stick to glass for a clean, neutral base.
Store the mixture in smaller jars if you plan to share or want to avoid exposing the entire batch to air each time.
Shelf Life and Refrigeration Tips
How long does homemade chili crisp last? That depends on how it’s stored.
| Storage Method | Shelf Life | Notes |
|---|---|---|
| Room temperature | 2–4 weeks | Keep in a cool, dark place |
| Refrigerated (sealed) | 2–3 months | Best for long-term freshness |
| Freezer (optional) | 3–6 months | Texture may change slightly |
Here are the rules I follow to keep the mixture tasting its best:
- Use a clean spoon every time—no double dipping
- Cool it completely before sealing the jar
- Don’t leave it uncovered—air exposure speeds up spoilage
- Refrigerate if your chili crisp has fresh ingredients like garlic or shallots that were lightly cooked
You’ll know it’s time to toss if it smells off, tastes bitter, or develops any cloudiness or mold.
When stored properly, the mixture will stay fresh, flavorful, and ready to elevate any meal.
Creative Ways to Use Homemade Chili Crisp
Ready to change the way you cook? Here are my favorite ways to use this flavorful mixture:
Homemade chili crisp isn’t just a condiment—it’s a flavor transformer. Whether you drizzle it, dollop it, or stir it in, this one ingredient brings heat, crunch, and umami to just about everything. From breakfast to side dishes, these real-life ideas show just how far one jar can go.
Explore this flavor-packed gallery and see how I use it in my own kitchen:
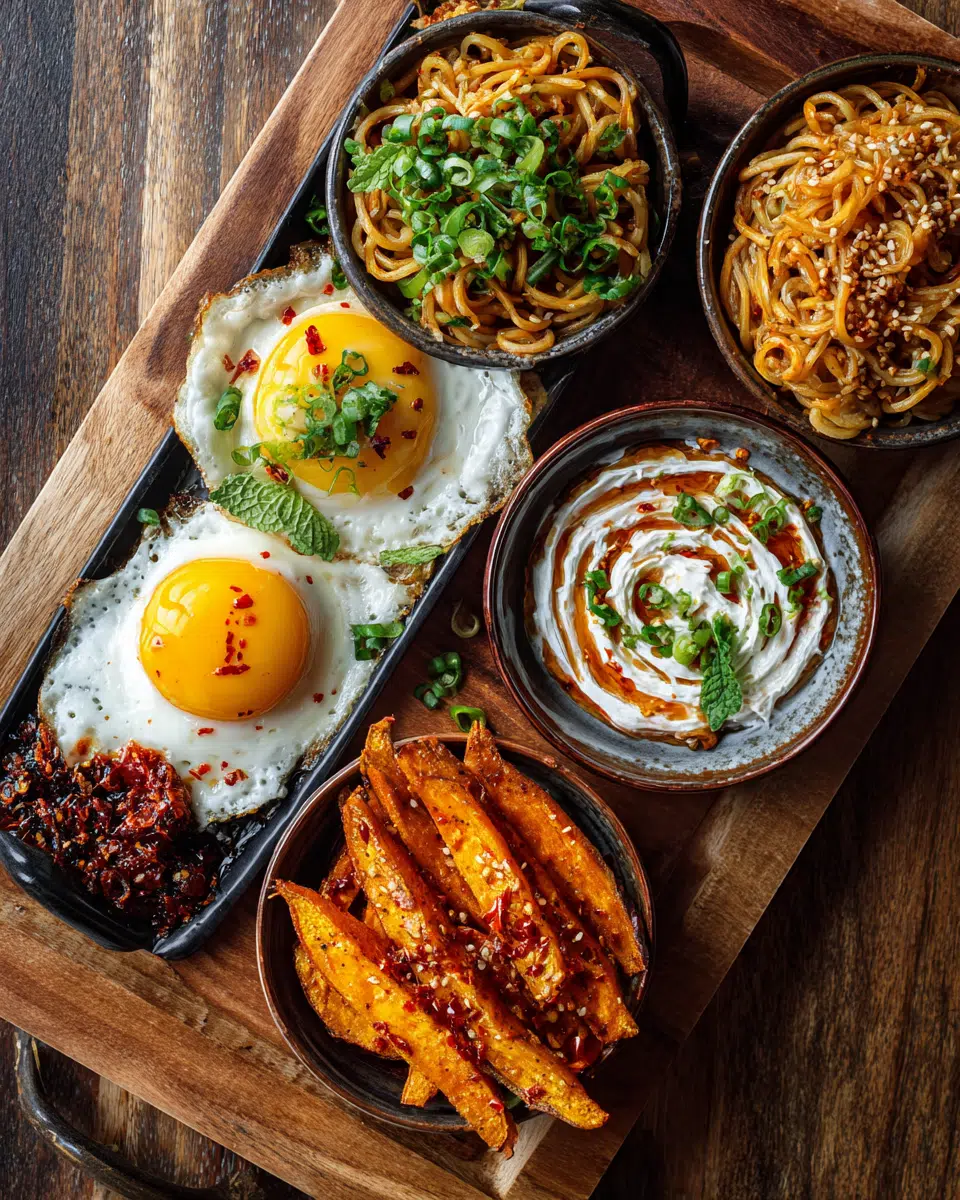
For the Perfect Breakfast
Chili Crisp Fried Eggs
Crispy eggs meet crispy chili. Add a spoonful to your pan while frying eggs for that next-level golden crust and a kick of heat. Serve it over toast, rice, or avocado for a bold morning bite.
For a Quick Lunch
10-Minute Spicy Chili Crisp Noodles
Need a fast, flavorful lunch? These noodles come together in minutes, with chili crisp acting as both the sauce and the crunch. Add a runny egg or leftover protein to make it a full meal.
For a Viral Appetizer
Hot Honey & Chili Crisp Whipped Feta
Whipped feta gets a spicy-sweet makeover with chili crisp and hot honey. It’s creamy, spicy, salty, and impossible to stop eating—perfect for parties, or just for you and some crackers.
The Surprising Veggie Upgrade
Roasted Sweet Potatoes with Chili Crisp & Lime
Sweet meets spicy. Roasted sweet potatoes tossed with chili crisp and a squeeze of lime bring out their natural caramelization while adding contrast and heat. It’s the side dish you didn’t know you needed.
Whether you’re topping eggs, mixing noodles, upgrading dips, or reinventing roasted vegetables, chili crisp proves its place as a pantry staple. One jar—endless flavor moves.
Common Mistakes to Avoid When Making Chili Crisp
Making homemade chili crisp is simple—but a few small missteps can ruin the whole batch. Burnt aromatics, bland flavor, or soggy texture? Been there. Avoid these common mistakes and your chili crisp will turn out perfect every time.
Burning the Aromatics: Garlic, Shallots & Spices
The most common mistake? Overheating your oil. Garlic and shallots go from golden to burnt in seconds, and burnt bits will make your chili crisp taste bitter.
How to avoid it:
- Keep your heat low to medium—never high.
- Stir constantly when frying aromatics.
- Watch for a golden brown color, then remove immediately.
Burnt garlic ruins everything. Be patient, and your crisp will reward you.
Not Layering Flavor: Too Flat or Too Hot
A good mixture is about more than just heat. If you only use hot chili flakes, you’ll get spice but no depth. If you skip umami boosters or salt, the flavor falls flat.
How to fix it:
- Use a mix of chili flakes: Gochugaru for color, Sichuan flakes for aroma, crushed red pepper for heat.
- Add soy sauce, fermented black beans, mushroom powder, or even a pinch of MSG for richness.
- Don’t forget sugar and salt—balance is key.
Layered flavor is what separates average chili crisp from crave-worthy chili crisp.
Using the Wrong Oil
Olive oil might sound fancy, but it’s not made for chili crisp. It burns fast and changes the flavor in the wrong direction.
Use high smoke-point oils like:
- Grapeseed oil
- Avocado oil
- Peanut oil
- Canola oil
These stay stable during heating and let your aromatics shine without turning bitter.
Skipping Cooling Time
Hot oil continues to cook your ingredients even after the pan is off the heat. If you jar it too soon, you risk sogginess, steam buildup, or overcooked flavors.
Pro tip: Let everything cool down in the bowl before sealing the jar. Give it time to rest—the flavor improves overnight.
Customize Your Homemade Chili Crisp
Vegan, Nut-Free, or Gluten-Free Options
The beauty of homemade chili crisp is that it’s naturally flexible—and easy to adapt for different diets. Whether you’re plant-based, avoiding gluten, or skipping nuts, here’s how to tweak your batch without losing flavor.
Vegan
Most traditional chili crisp recipes are already vegan. But to be sure:
- Use soy sauce instead of fish sauce or oyster sauce.
- Skip any animal-based umami enhancers (like dried shrimp) and use mushroom powder or fermented soybeans for richness.
- Avoid butter or ghee—stick to plant-based oils like avocado or grapeseed.
Nut-Free
Some store-bought versions include peanuts or use peanut oil. To keep yours nut-free:
- Use grapeseed, sunflower, or canola oil.
- Skip crushed peanuts or sesame if allergies are a concern.
- Boost crunch with fried garlic, shallots, or puffed rice instead.
Gluten-Free
To keep your chili crisp completely gluten-free:
- Make sure your soy sauce is gluten-free (or use tamari or coconut aminos).
- Check any fermented ingredients or spice blends to confirm there’s no hidden wheat.
With these swaps, you can enjoy all the flavor—without the stress.
Flavor Variations from Different Regions
Once you’ve mastered the base, try experimenting with regional influences. Homemade chili crisp can reflect the flavors you love most—from smoky Mexican-style heat to Thai sweetness or bold Sichuan mala.
| Style | Flavor Notes | Key Ingredients |
|---|---|---|
| Sichuan | Numbing, spicy, aromatic | Sichuan peppercorns, star anise, soy |
| Thai | Sweet heat with citrusy zing | Thai chili flakes, lemongrass, lime |
| Mexican | Smoky and earthy | Chipotle, smoked paprika, cumin |
| Japanese | Light heat, savory and nutty | Sesame seeds, miso powder, bonito |
| Middle Eastern | Warm, complex, slightly sweet | Aleppo pepper, cinnamon, sumac |
These versions still follow the same cooking process—just swap in the regionally inspired spices and flavors. It’s the same crisp, but with a global personality.
Conclusion: Make It, Taste It, Own It
Homemade chili crisp isn’t just a condiment—it’s a flavor revolution you create with your own hands. Whether you love it smoky, garlicky, or mouth-numbingly spicy, crafting your own batch means full control, full flavor, and full satisfaction.
From the basics of oil and aromatics to customizing with global spices, you now have everything you need to make chili crisp your way. And once you start spooning it onto your breakfast, tossing it with noodles, or swirling it into creamy dips—you’ll wonder how you ever cooked without it.
Frequently Asked Questions About Homemade Chili Crisp
What is chili crisp made of?
Chili crisp is made by infusing hot oil with dried chili flakes, garlic, shallots, and spices like star anise or Sichuan peppercorns. The “crisp” comes from frying aromatics until golden and crunchy. Some versions include soy sauce, fermented beans, or mushroom powder to boost umami.
How long does homemade chili crisp last?
When stored in a clean, airtight glass jar, homemade chili crisp can last:
2 to 4 weeks at room temperature (cool, dark spot)
2 to 3 months in the refrigerator
Always use a clean spoon to avoid contamination and seal the jar tightly after every use.
Can I make chili crisp without MSG?
Absolutely. MSG adds umami, but it’s optional. For a natural alternative, use:
Mushroom powder
Fermented black beans
Nutritional yeast
These give you that rich, savory layer without adding MSG.
What oil is best for chili crisp?
The best oils for homemade chili crisp are neutral and have a high smoke point. Top choices include:
Grapeseed oil
Avocado oil
Canola oil
Peanut oil
Avoid olive oil or coconut oil, as their strong flavors can overpower the crisp’s spices.
How spicy is chili crisp?
That depends on your chili flakes. A balanced homemade version has heat, but not overwhelming burn. You can control spice level by:
Using milder flakes like gochugaru
Combining multiple chili types
Removing seeds from hotter peppers
Start mild—you can always add more heat later.
Don’t miss the next viral recipe—follow me on Facebook and save every masterpiece to your Pinterest boards!