
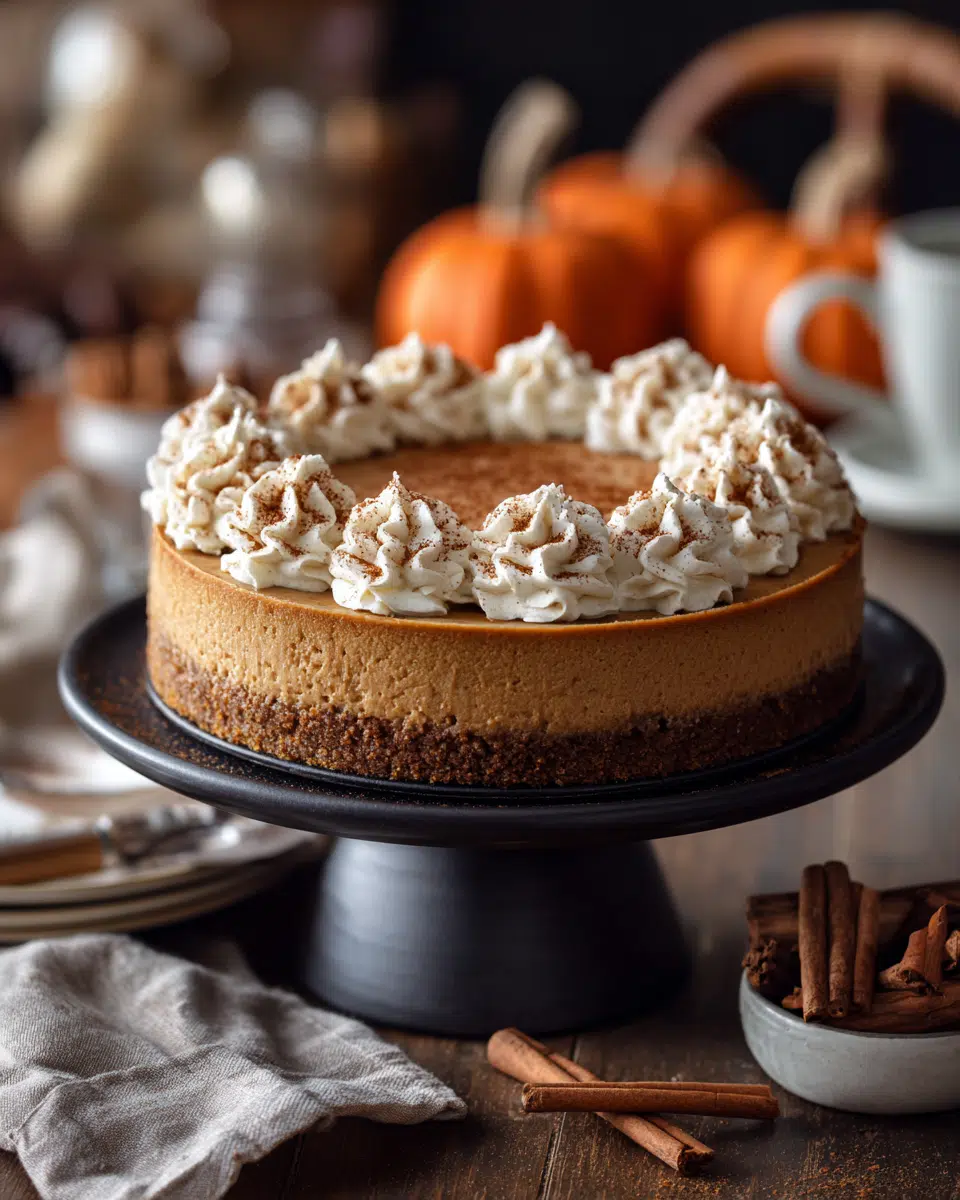
When fall flavors start calling, there’s one dessert that always rises to the top: No-Bake Pumpkin Cheesecake. Creamy, spiced just right, and layered on a crunchy gingersnap crust — it’s a seasonal showstopper that requires zero oven time. Whether you’re prepping for Thanksgiving or just craving something cozy, this no-bake version saves you time without sacrificing flavor. Even better, it sets beautifully in the fridge, making it perfect for make-ahead gatherings or relaxed weekends.
Looking for inspiration beyond pumpkin? Check out Cranberry Pistachio Cookies for another festive treat to add to your autumn baking list.
Sweet Navigation
Why Choose a No‑Bake Pumpkin Cheesecake
A Simple Yet Impressive Alternative to Baked Cheesecake
Traditional baked cheesecakes are delicious—but let’s be honest, they can be fussy. Between water baths, oven times, and cracked tops, there’s a lot that can go wrong. A no-bake pumpkin cheesecake offers all the creamy indulgence with none of the stress. You don’t even need to turn on your oven. It sets up perfectly in the fridge, holds its shape beautifully when sliced, and tastes just as rich and satisfying as the classic.
This dessert is ideal for busy holiday prep when oven space is limited or the weather is still a little too warm for baking. And because it chills overnight, you can make it ahead of time and focus on other dishes or hosting duties.
Perfect for Any Fall Gathering
From Halloween parties to Thanksgiving feasts, this cheesecake brings cozy fall vibes to any table. The combination of pumpkin, cinnamon, and creamy filling makes it feel like autumn in every bite. Plus, the ginger-spiced cookie crust adds just the right crunch to balance out the soft, silky center.
Whether you’re serving guests or treating yourself to a seasonal dessert, no-bake pumpkin cheesecake delivers that warm, nostalgic flavor with half the work.
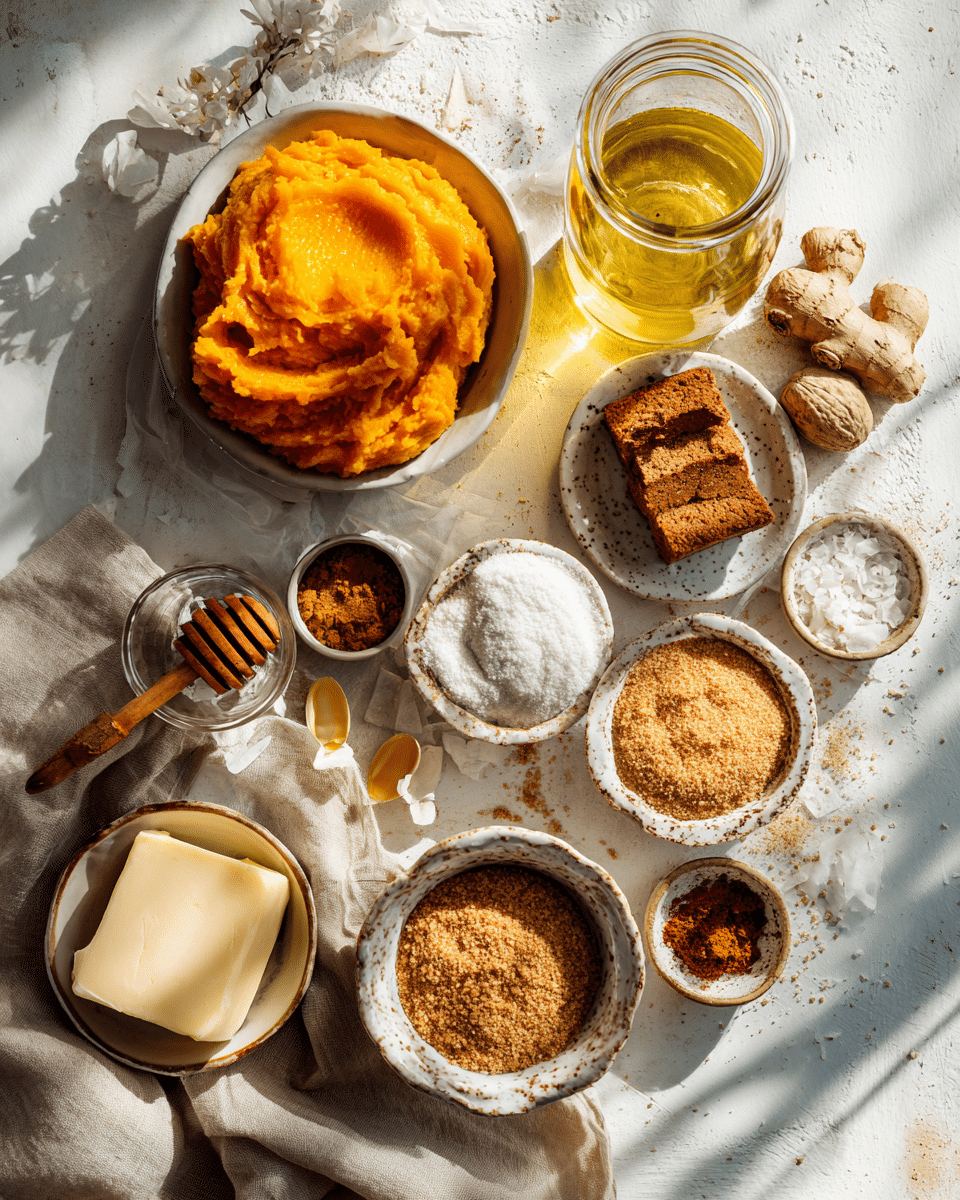
Ingredients You’ll Need
The Gingersnap Crust: Crunchy, Spiced Perfection
The foundation of any great cheesecake is its crust—and in this recipe, the gingersnap base steals the show. Made with crushed gingersnap cookies, a touch of cinnamon and ginger, melted butter, and sugar, this crust is packed with autumn flavor and just the right amount of crunch.
For best results, use dry, crisp store-bought gingersnap cookies—Stauffer’s brand works beautifully. Softer cookies (like Nabisco’s) tend to fall apart and won’t give you that sturdy base. If gingersnaps aren’t your thing, you can swap in a classic graham cracker crust with similar success.
| Ingredient | Quantity | Notes |
|---|---|---|
| Gingersnap crumbs | 2 cups (200g) | About 30 cookies |
| Ground ginger | 1/4 teaspoon | Adjust to taste |
| Ground cinnamon | 1/4 teaspoon | Adds warmth |
| Unsalted butter | 6 Tbsp (85g) | Melted |
| Brown or white sugar | 1/4 cup (50g) | Packed for richness |
Tip: Use the bottom of a measuring cup to press the crust tightly into a springform pan. This helps it hold together once sliced.
The Creamy Pumpkin Filling: Cozy, Fluffy, No Oven Needed
This filling is where the magic happens—light yet rich, pumpkin-spiced yet creamy. The whipped cream gives it airiness, while the cream cheese and pumpkin puree give it body and tang. Using full-fat brick cream cheese is essential for the right texture. And don’t skip the pumpkin pie spice—it ties the whole dessert together.
| Ingredient | Quantity | Purpose |
|---|---|---|
| Cold heavy cream | 1 cup (240ml) | Whipped to soft peaks |
| Cream cheese (brick) | 16 oz (452g) | Room temperature |
| Pumpkin puree (canned) | 1 cup (227g) | Not pumpkin pie filling! |
| Confectioners’ sugar | 3/4 cup (90g) | Smooth texture |
| Brown sugar | 1/4 cup (50g) | Adds depth |
| Vanilla extract | 1 tsp | For flavor |
| Pumpkin pie spice | 2 tsp | Or homemade mix |
| Ground cinnamon | 1/2 tsp | Boosts warmth |
| Salt | 1/8 tsp | Balances sweetness |
Want to switch it up? Try sweet potato puree instead of pumpkin for a similar taste with a slightly different twist. Just make sure it’s cool before adding it in.
Step‑by‑Step Instructions
Making and Chilling the Gingersnap Crust
The crust is the first layer—and it’s what gives your cheesecake that satisfying crunch. Start by combining your gingersnap crumbs, spices, melted butter, and sugar in a large bowl. Stir until the mixture resembles wet sand and everything is evenly coated.
Pour the crumb mixture into a 9- or 10-inch springform pan. Use the bottom of a measuring cup or glass to press it firmly into the bottom and slightly up the sides. A well-packed crust ensures your cheesecake slices won’t fall apart later.
Once packed, place the crust in the freezer for at least 10–20 minutes. This helps it firm up while you prepare the filling.
🔥 Pro Tip: If you’re making this ahead, you can freeze the crust for up to an hour, then cover and refrigerate it for 1–2 days before adding the filling.
Preparing the Cheesecake Filling
Begin by whipping the cold heavy cream until stiff peaks form—this takes about 4 minutes on medium-high speed with a stand or hand mixer. Set the whipped cream aside.
In a clean bowl, beat the softened cream cheese until smooth and creamy, scraping down the sides as needed. Add in the pumpkin puree, confectioners’ sugar, and brown sugar. Continue beating on medium-high until the mixture is well-blended and lump-free.
Now add the vanilla, pumpkin pie spice, cinnamon, and a pinch of salt. Beat again until everything is creamy and smooth. Texture matters here—you want it rich but airy.
Gently fold the whipped cream into the cream cheese mixture using a spatula. Don’t stir too vigorously; folding preserves the air in the whipped cream and keeps the filling light.
Once fully combined, spoon the filling onto the chilled crust. Smooth the top with an offset spatula.
⏱ Chill Time: Cover tightly with foil or plastic wrap and refrigerate for at least 8 hours. For the best texture, let it sit for 12 hours or overnight.
No‑Bake Pumpkin Cheesecake: A Creamy, Fall‑Inspired Dessert You’ll Love
- Total Time: 8–12 hours
- Yield: 12 slices
- Diet: Vegetarian
Description
A creamy, chilled no-bake pumpkin cheesecake with spiced gingersnap crust. Perfect for fall gatherings.
Ingredients
2 cups (200g) gingersnap cookie crumbs
1/4 teaspoon ground ginger
1/4 teaspoon ground cinnamon
6 tablespoons (85g) unsalted butter, melted
1/4 cup (50g) packed brown or granulated sugar
1 cup (240ml) cold heavy cream
16 ounces (452g) full-fat brick cream cheese, softened
1 cup (227g) canned pumpkin puree
3/4 cup (90g) confectioners’ sugar
1/4 cup (50g) packed light or dark brown sugar
1 teaspoon pure vanilla extract
2 teaspoons pumpkin pie spice
1/2 teaspoon ground cinnamon
1/8 teaspoon salt
Instructions
1. Combine gingersnap crumbs, spices, melted butter, and sugar. Press into a springform pan and freeze for 10–20 minutes.
2. Whip cold heavy cream until stiff peaks form. Set aside.
3. In a separate bowl, beat softened cream cheese until smooth.
4. Add pumpkin puree, confectioners’ sugar, and brown sugar. Mix until combined.
5. Add vanilla, pumpkin pie spice, cinnamon, and salt. Beat until creamy.
6. Gently fold whipped cream into the pumpkin mixture using a spatula.
7. Spread filling into crust and smooth the top with an offset spatula.
8. Cover tightly and refrigerate for at least 8 hours, preferably overnight.
9. Remove springform rim, slice with a hot knife, and serve with desired toppings.
Notes
Use canned pumpkin, not fresh or pumpkin pie filling, for best setting.
Chill the cheesecake for at least 8 hours. Overnight works best.
Press crust firmly and evenly to prevent crumbling.
Wrap tightly and freeze for up to 3 months if needed.
- Prep Time: 25 minutes
- Cook Time: 0 minutes
- Category: Dessert
- Method: No-Bake
- Cuisine: American
Tips for Best Results
Keep the Crust Firm and Sliceable
A weak crust can ruin an otherwise perfect cheesecake. The key to a sturdy no-bake crust is dryness and compression. Make sure your gingersnap cookies are completely dry—store-bought options usually work best. Once you crush them and mix with butter and sugar, pack the mixture down tightly with a flat-bottomed tool like a measuring cup.
If the crust is too loose, it will crumble when sliced. If it’s too wet, it won’t firm up. Stick to the proportions provided, and don’t skip the freezer step.
✅ Tip: Let the crust freeze while you prep the filling. The colder it is, the better it will support the creamy layer.
Avoid Lumps for a Smooth, Creamy Filling
The enemy of any no-bake cheesecake? Lumps of cream cheese. To keep your filling silky smooth:
- Let your cream cheese soften fully to room temperature before mixing.
- Beat it alone first until no lumps remain before adding other ingredients.
- Scrape down the bowl often to incorporate every bit of the mixture.
If your cream cheese is too cold, it will never fully smooth out, no matter how long you beat it.
🧁 Tip: If needed, run the mixer an extra 30 seconds to ensure everything is combined.
Don’t Rush the Chill
Patience pays off. A no-bake cheesecake needs time to set properly. While it may look firm after a few hours, the full 8–12 hours in the fridge allows the filling to stabilize and makes slicing much easier.
Skipping this step may result in a messy, soft texture that falls apart when you cut it.
❄️ Best Practice: Chill overnight and serve the next day for the cleanest presentation.
Common Mistakes & How to Avoid Them
Mistake 1: Over- or Under-Whipping the Cream
The whipped cream is what gives your no-bake cheesecake its signature light and airy texture. If you under-whip, the filling won’t hold its shape. Over-whip, and the cream may turn grainy or even begin to separate.
Whip until soft peaks form that just hold their shape. Stop as soon as the cream holds peaks when you lift the beaters. This ensures the filling stays smooth and fluffy.
Mistake 2: Mixing Too Aggressively
Once your whipped cream and cream cheese mixture are ready, it’s tempting to just stir them together quickly. But that’s a shortcut that can deflate the air you worked so hard to incorporate. Always fold the whipped cream in slowly using a spatula, turning the bowl and lifting gently from the bottom. This keeps the final texture airy and smooth.
Mistake 3: Using Warm or Fresh Pumpkin Puree
Using warm ingredients—especially pumpkin puree—can lead to a filling that won’t set. The best results come from cold or room-temperature ingredients. Also, avoid using fresh pumpkin puree, which often has a higher water content and leads to a soft, unstable cheesecake.
Stick with canned pumpkin puree for consistent results. Libby’s brand is a reliable option.
Mistake 4: Cutting Before Fully Chilled
Slicing a no-bake cheesecake too soon is one of the most common mistakes. The filling needs time to firm up. If you try to cut it early, you’ll end up with a messy, loose slice that lacks structure. Chill the cheesecake for at least 8 hours—preferably 12—for the cleanest slices.
Always run a sharp knife under hot water, dry it, and then slice. Wipe the knife clean between each cut for neat presentation.
Variations & Substitutions
Crust Alternatives for Every Preference
While the gingersnap crust adds warm spice and crunch, there are plenty of other base options if you want to mix it up:
- Graham cracker crust: A classic choice with a neutral, slightly sweet flavor. Perfect if you’re not a fan of ginger.
- Oreo cookie crust: For a richer, chocolatey base, use crushed chocolate sandwich cookies with the filling removed.
- Biscoff or speculoos cookies: These spiced cookies give a unique caramelized depth that pairs well with pumpkin.
Feel free to adjust the spice levels in the crust. You can dial up the cinnamon or ginger depending on your personal taste.
Filling Swaps and Dietary Tweaks
Looking to adapt the cheesecake to your dietary needs or available ingredients? Here are a few common substitutions that work well:
- Cream cheese: For a slightly lighter version, use reduced-fat cream cheese, though the texture may be softer.
- Pumpkin puree: Sweet potato puree is a great alternative. Boil, mash, and cool thoroughly before using.
- Whipped cream: Non-dairy whipped toppings can be used, but make sure they’re stabilized to hold structure.
Always aim for cold ingredients and measure carefully to maintain the structure of the no-bake filling.
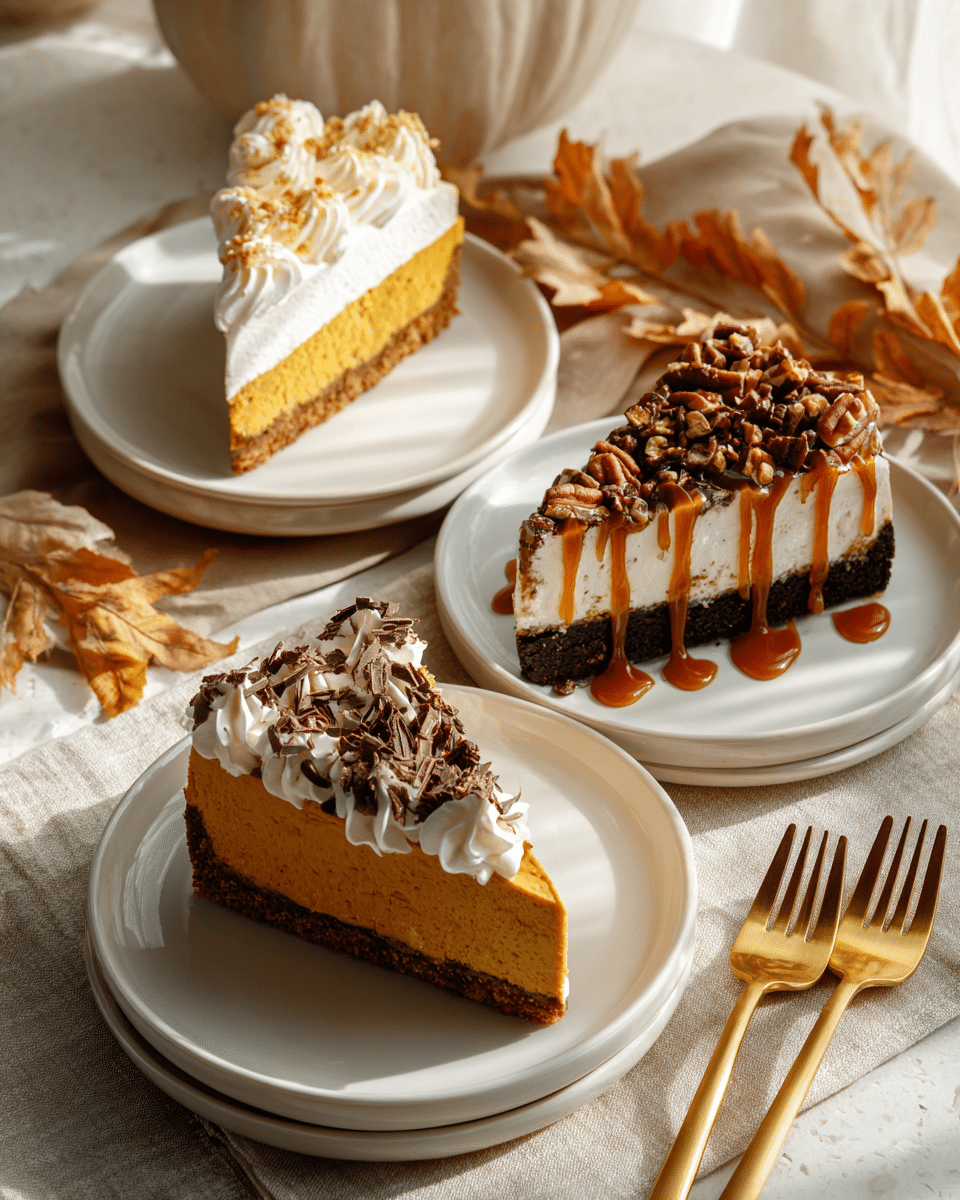
Flavor Boosts and Mix-Ins
To personalize your no-bake pumpkin cheesecake, consider these fun additions:
- Swirl in caramel or dulce de leche before chilling for an extra layer of flavor.
- Fold in crushed pecans or walnuts for texture and nuttiness.
- Add a splash of maple syrup to the filling for a sweet fall twist.
The base recipe is flexible and forgiving, so you can get creative without compromising the final result.
Make‑Ahead, Storage & Serving
How to Prep in Advance Without Losing Quality
One of the biggest advantages of this no-bake pumpkin cheesecake is how well it fits into a busy schedule. You can prepare the entire dessert—or its components—well ahead of time.
- Crust only: Make and freeze the crust for up to 1 hour, then cover and refrigerate for 1–2 days.
- Full cheesecake: Once assembled, it can chill in the fridge for up to 2 full days before serving. Just keep it tightly covered to avoid absorbing odors.
- Freezing option: After fully setting in the fridge, wrap the cheesecake in plastic and foil and freeze for up to 3 months. Thaw in the fridge overnight before serving.
This flexibility makes it a great choice for entertaining or holiday prep when time is limited.
How to Store Leftovers
After slicing, cover any remaining cheesecake tightly with foil or plastic wrap. Store in the refrigerator for up to 5 days. The crust may soften slightly over time but the flavor and texture remain enjoyable.
Avoid leaving it out at room temperature for extended periods, especially if using dairy-based whipped cream on top.
Serving Suggestions to Impress
Serve chilled, straight from the fridge. For clean slices, use a sharp knife warmed in hot water and wipe it clean between cuts.
Topping ideas include:
- Fresh whipped cream, piped or dolloped
- Salted caramel drizzle
- Crushed nuts or cookie crumbles
- A sprinkle of cinnamon or nutmeg
These final touches add both visual appeal and complementary flavors that enhance each bite.
Health & Dietary Considerations
Lower-Sugar Options That Still Taste Great
If you’re watching your sugar intake, this no-bake pumpkin cheesecake can be adjusted without sacrificing flavor. Here are some ideas:
- Swap out sugars: Use a sugar substitute like erythritol or monk fruit sweetener for both the crust and the filling.
- Reduce the total sugar amount: You can slightly cut back on both the confectioners’ and brown sugar without altering texture too much.
- Choose a low-sugar whipped topping: Homemade whipped cream with less sugar gives you more control over sweetness.
Keep in mind that sugar does contribute to the structure and mouthfeel, so experiment carefully to keep the right balance.
Dairy-Free or Vegan Adaptations
Although this recipe uses traditional dairy ingredients, it can be adapted for a dairy-free or vegan diet:
- Cream cheese: Use a vegan cream cheese alternative (such as one made from cashews or almonds).
- Heavy cream: Substitute with coconut cream or a dairy-free whipped topping.
- Butter in the crust: Replace with coconut oil or vegan butter.
Always check for unsweetened and unflavored options to maintain the intended taste of the cheesecake.
Nutritional Snapshot (Estimated Per Slice)
For those tracking macros or calories, here’s an approximate breakdown for a standard slice (1/12th of the cheesecake):
| Nutrient | Amount (Approx.) |
|---|---|
| Calories | 340–380 kcal |
| Fat | 26–30g |
| Carbohydrates | 22–26g |
| Sugars | 15–18g |
| Protein | 4–5g |
These numbers will vary based on the specific brands and any substitutions you use. For a lighter option, consider making mini cheesecakes in muffin tins with smaller portions.
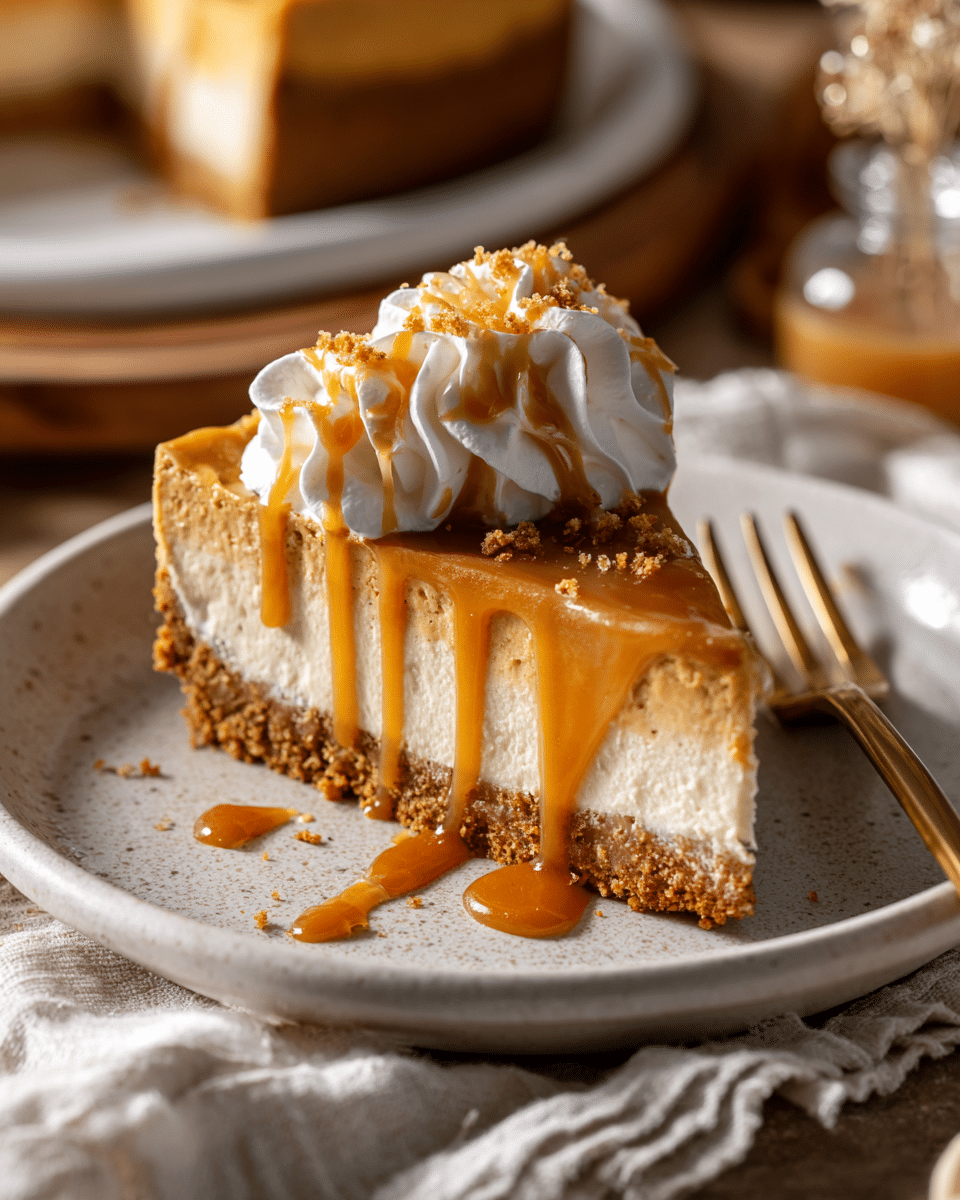
Serving & Presentation Ideas
How to Plate for Maximum Visual Impact
Presentation matters—especially with a dessert as elegant as this. A clean, chilled cheesecake with sharp slices and well-placed toppings can transform a simple treat into a centerpiece.
Here’s how to serve it beautifully:
- Use a hot knife for slicing: Run it under hot water, wipe it dry, and slice cleanly.
- Plate each slice with a dollop of whipped cream using a piping tip (like Ateco 849) for bakery-style results.
- Drizzle with salted caramel or maple syrup just before serving for a glossy finish.
- Add a dusting of cinnamon or nutmeg for extra fall flavor and contrast.
For extra flair, serve slices on white plates to make the orange hue of the cheesecake pop. Garnish with a cinnamon stick or a few gingersnap crumbs.
When and Where to Serve It
This cheesecake is versatile enough for:
- Holiday gatherings: Thanksgiving, Halloween, Friendsgiving
- Dinner parties: A make-ahead dessert that impresses with zero stress
- Weekend treats: When you want something indulgent but easy
Because it can be made ahead and stored, it’s perfect for events where you need one less thing to worry about on the day-of.
Whether it’s dressed up for guests or kept casual for the family, no-bake pumpkin cheesecake fits the moment.
Conclusion
A no-bake pumpkin cheesecake is more than just an easy dessert—it’s a creamy, spiced celebration of fall in every bite. From its buttery gingersnap crust to its silky pumpkin filling, this recipe delivers comforting flavor without the need for baking or complicated techniques.
It’s the kind of dessert that fits any autumn occasion, whether you’re hosting a dinner party, planning a holiday spread, or just craving something sweet and seasonal. And with flexible prep times, make-ahead options, and endless variations, it’s a reliable favorite you’ll come back to year after year.
Looking for more cozy ideas? Discover great flavors in Maple Pumpkin Seed Fudge or try this Apple Pie Salsa Recipe for a fun twist on fall classics.
Frequently Asked Questions
How long should no-bake pumpkin cheesecake chill to set properly?
For the best texture and structure, the cheesecake should chill for at least 8 hours, though 12 hours or overnight is strongly recommended. This allows the filling to firm up fully, making it easier to slice and serve.
What are the most common no-bake pumpkin cheesecake mistakes?
Common mistakes include under-whipping the cream, using warm or fresh pumpkin puree (which may cause the filling to be too soft), and slicing before the cheesecake has fully set. It’s also important to use brick-style cream cheese—not whipped or spreadable types.
Can I use fresh pumpkin instead of canned in a no-bake cheesecake?
Fresh pumpkin puree often contains too much moisture, which can prevent the cheesecake from setting properly. For the most reliable results, use canned pumpkin puree (not pumpkin pie filling). If you must use fresh, drain it thoroughly and blend it until smooth.
How to achieve the perfect crust that holds together when slicing?
Use dry, crisp cookies like Stauffer’s gingersnaps, and press the crumb mixture firmly into the pan. A tightly packed crust that chills well will slice cleanly. Avoid moist cookies, which can lead to crumbling.
Craving more edible art? Follow my culinary adventures on Facebook and save your next masterpiece on Pinterest!