
Table of Contents
The Upside-Down Puff Pastry Tart is turning heads in kitchens everywhere—and for good reason. With its deeply caramelized top, perfectly puffed layers, and Instagram-worthy presentation, this technique flips the tart game on its head. Whether you’re craving something sweet or savory, the upside-down method delivers crisp texture, bold flavor, and easy elegance.
In this ultimate guide, you’ll learn the rules of working with puff pastry, tips for preventing soggy bottoms, how to prep your tart ahead of time, and delicious recipe variations. Get ready to bake like a pro with step-by-step advice and creative inspiration.
Looking for more pastry ideas? Check out this Puff Pastry Dessert Recipes
Introduction to Upside-Down Puff Pastry Tarts
What Is an Upside-Down Puff Pastry Tart?
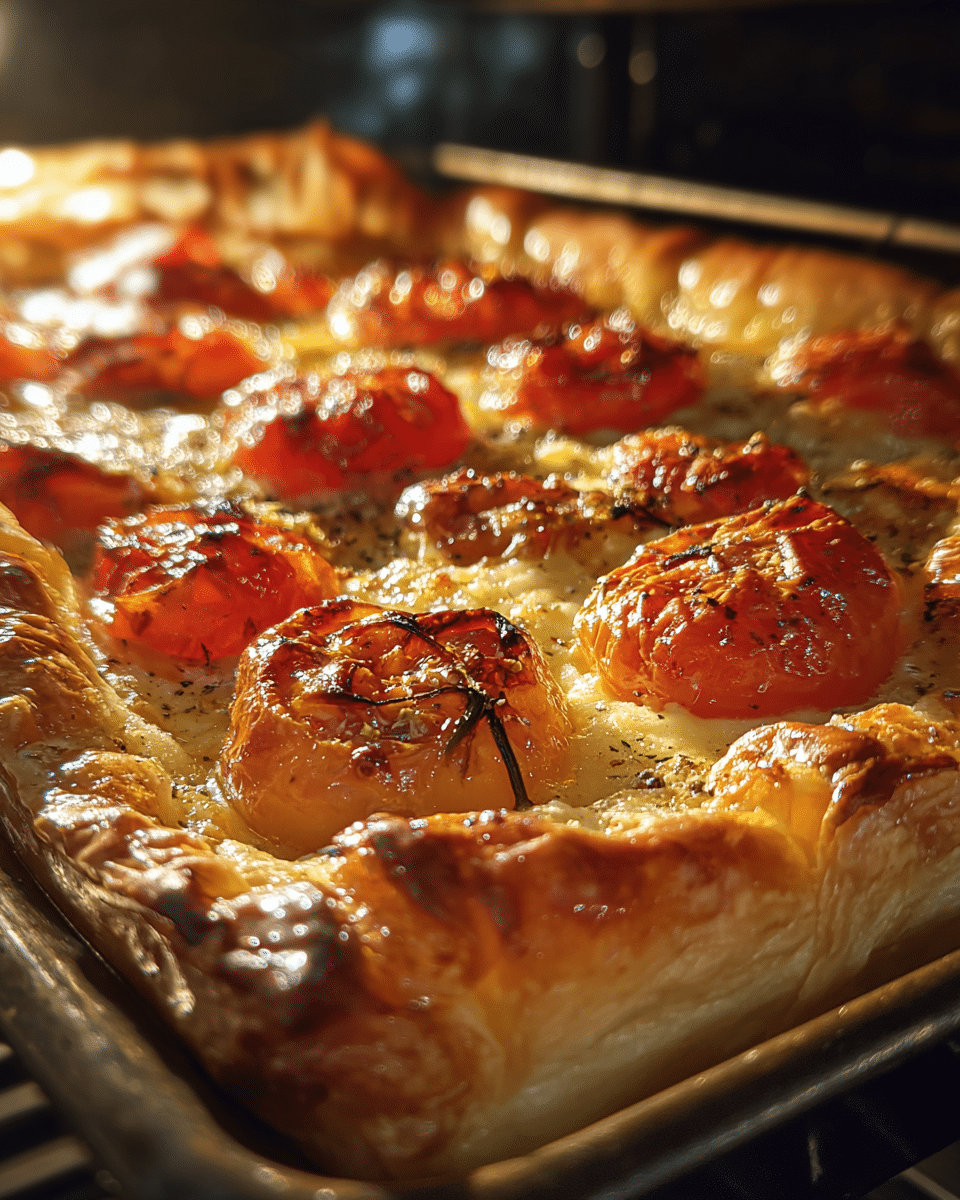
An upside-down puff pastry tart is a clever spin on the classic tart. Instead of laying toppings on top of the pastry before baking, you place your ingredients directly onto the baking tray or dish first—often with a touch of butter or sugar—then lay the pastry over them. Once baked, the tart is flipped upside down to reveal a glossy, caramelized top and a crisp, flaky base.
This reverse baking method is rooted in the French tarte tatin, but home bakers are now using it for everything from roasted vegetables to stone fruits. It’s more than just a visual upgrade—it enhances flavor, texture, and even baking consistency.
Why Is This Technique Trending in 2025?
Upside-down tarts are dominating food blogs and social media feeds in 2025. Why? Because they offer:
- A consistently crisp crust – No more soggy bottoms.
- Even caramelization – Ingredients cook directly against the hot tray.
- Stunning visuals – Every tart looks like a work of art.
They’re also incredibly versatile. With a single sheet of puff pastry, you can whip up a crowd-pleasing appetizer or a gorgeous dessert. Plus, the method makes cleanup easier—no soggy tart pans, no leaks, no crust disasters.
Benefits of Using Inverse Puff Pastry Method
What Makes the Inverted Tart Unique
The inverse puff pastry method—also known as the upside-down tart technique—isn’t just a quirky trend. It’s a practical baking strategy that elevates your tart in both texture and flavor. By placing your ingredients under the puff pastry instead of on top, you allow the toppings to bake directly against the hot tray or skillet surface. This results in a deeply caramelized layer that becomes the glossy, flavorful top once flipped.
This method also allows gravity and heat to work in your favor. Juices and natural sugars concentrate and bubble upward into the pastry. The dough puffs above, protected from direct moisture, baking into a perfectly crisp and golden shell.
Still working on mastering dough techniques?
Check out this guide to a rustic-style peach galette for more crust control inspiration.
The Crispier Bottom Advantage
One of the biggest challenges when baking traditional tarts is avoiding a soggy or underbaked bottom crust. With the upside-down puff pastry tart, you simply flip the script—literally.
By placing the pastry on top while baking, it’s exposed to dry heat and airflow, which helps it rise and crisp. Meanwhile, the ingredients below caramelize without soaking into the dough. That makes this technique ideal for:
- Juicy fruits like apples or pears
- Tomatoes or other high-moisture vegetables
- Cheese-based fillings that can melt and bubble
The result? A tart that’s both crisp and structurally sound, with layers that flake beautifully on the plate and in your mouth.
Try a dessert variation with a complex flavor twist:
Don’t miss our Almond Dacquoise Cream Clouds
Whether you’re creating a brunch-worthy savory tart or a sweet, sticky fruit version, the inverted method gives you maximum control over texture—plus that satisfying moment when you flip it over and reveal your golden masterpiece.
Essential Puff Pastry Rules You Should Follow
Puff Pastry Do’s and Don’ts
Working with puff pastry can be incredibly rewarding—but only if you follow the rules. Because puff pastry is a laminated dough with delicate layers of butter and flour, it needs specific handling to perform its best. Whether you’re using store-bought sheets or making it from scratch, these are the golden rules to follow:
Do:
- Keep the dough cold at all times. Warm butter melts and ruins lamination.
- Roll gently and evenly to preserve layers. Use minimal flour for dusting.
- Dock (poke holes in) the pastry only if you want to reduce puffing—not for upside-down tarts.
- Let the tart cool slightly before flipping to avoid tearing the crust.
Don’t:
- Refreeze thawed pastry—it breaks down the structure.
- Stretch the dough—it will shrink back and bake unevenly.
- Overload with wet ingredients—they’ll seep through before the pastry cooks.
Following these basics makes a big difference in how your upside-down puff pastry tart turns out. You’ll get better puff, a stronger crust, and a more even bake.
For a sweet tart with beautiful contrast in texture,
Try this white chocolate and rose mousse tart
Handling, Rolling, and Storage Tips
How you handle puff pastry determines its final texture. Here’s what every home baker should keep in mind:
1. Thawing Properly
If you’re using frozen pastry, thaw it in the refrigerator—not at room temperature. Slow thawing keeps the butter cold and the layers intact.
2. Rolling Out the Dough
Roll from the center outward. If you’re making individual tartlets or mini tarts, cut your shapes before topping to avoid distorting the pastry.
3. Storing Your Pastry
- Unbaked: Store rolled-out pastry between sheets of parchment, tightly wrapped, in the fridge for up to 2 days.
- Baked: Store cooled tarts in an airtight container. To re-crisp, heat in the oven (never microwave).
- Leftover dough: Don’t toss scraps. Stack (don’t ball) and re-roll for smaller uses like puff pastry twists.
Mastering the basics of puff pastry technique is crucial to getting consistently golden and flaky results—especially when using the upside-down method. Once you nail this, the possibilities are endless.
How to Prevent a Soggy Bottom in Puff Pastry Tarts
Blind Baking & Layering Techniques
One of the most frustrating issues in tart-making is biting into a beautifully crisp top only to find a soggy, limp bottom. With puff pastry, this can happen even faster due to the thin, buttery layers. Luckily, the upside-down method already helps solve this, but with a few extra steps, you can guarantee a crisp finish every time.
Blind baking isn’t typically used for upside-down puff pastry tarts, since the pastry sits on top during baking. However, if you’re making an open tart variation, par-baking the crust (with pie weights or dried beans) can help create a moisture barrier before you add fillings.
When baking an upside-down tart:
- Always use a metal or ceramic baking tray, not glass. It conducts heat better and caramelizes the base.
- Preheat the oven fully and even preheat the tray if needed. A hot surface gives the base a head start.
- Let ingredients cool before layering them. Hot or steaming toppings can soften the pastry before it starts to bake.
Ingredients That Soak Less Moisture
Some ingredients naturally carry a lot of water—especially fruits, tomatoes, and certain cheeses. For a non-soggy result, choose wisely or prepare your ingredients in advance.
Low-moisture ingredients for savory tarts:
- Roasted vegetables (e.g., squash, eggplant, mushrooms)
- Pre-cooked spinach or kale (squeeze out moisture)
- Aged cheeses like feta or goat cheese
Low-moisture ingredients for sweet tarts:
- Firm apples or pears
- Berries tossed with cornstarch
- Dried fruits rehydrated in syrup
Also, layering matters. Try brushing your base layer (which ends up on top after flipping) with:
- A thin layer of egg wash
- Shredded cheese (it melts into a crispy base)
- A sprinkle of ground nuts or breadcrumbs to absorb moisture
Want to see how creamy elements play nicely in a tart?
Don’t miss this goat cheese crème brûlée recipe
By understanding how heat, ingredients, and layering work together, you’ll never serve a soggy tart again. Your puff pastry will stay flaky and buttery all the way through.

Upside-Down Puff Pastry Tart: The Best Method to Bake Crispy Tarts Every Time
- Total Time: 40 minutes
- Yield: 4–6 servings
- Diet: Vegetarian
Description
This upside-down puff pastry tart delivers a golden, crispy crust with deeply caramelized toppings. Ideal for both sweet and savory versions.
Ingredients
1 sheet puff pastry (store-bought or homemade)
2 medium red onions, thinly sliced
1 tbsp olive oil
1 tsp balsamic vinegar
½ tsp sugar
3 oz goat cheese or feta
Fresh thyme (optional)
Salt and pepper to taste
1 egg (for egg wash)
Instructions
1. Preheat oven to 400°F (200°C). Caramelize onions in olive oil, balsamic vinegar, and sugar until soft.
2. Place parchment paper on a baking tray. Spread onions evenly in a circle.
3. Lay puff pastry sheet over onions, trimming edges if necessary. Tuck in sides and poke small steam vents.
4. Brush with egg wash.
5. Bake for 20–25 minutes or until golden and puffed.
6. Cool for 5 minutes. Flip tart onto a serving plate and peel off parchment.
7. Top with crumbled goat cheese and fresh thyme before serving.
Notes
Let the tart rest before flipping to prevent tearing.
Use aged cheese for better melting and flavor.
Avoid using high-moisture vegetables without pre-cooking.
- Prep Time: 15 minutes
- Cook Time: 25 minutes
- Category: Tarts
- Method: Baking
- Cuisine: French-Inspired
Step-by-Step Recipe: Upside-Down Puff Pastry Tart
Tools & Ingredients You’ll Need
Before diving into your first upside-down puff pastry tart, make sure you’ve got everything prepped. One of the best things about this recipe is how minimal it can be—just a few quality ingredients and basic tools go a long way.
🧂 Ingredients (Savory Version Example)
- 1 sheet of puff pastry (store-bought or homemade)
- 2 medium red onions (thinly sliced)
- 1 tbsp olive oil
- 1 tsp balsamic vinegar
- ½ tsp sugar
- 3 oz goat cheese or feta
- Fresh thyme (optional)
- Salt and pepper to taste
- 1 egg (for egg wash)
🛠️ Tools
- Baking tray or skillet (oven-safe)
- Parchment paper
- Rolling pin
- Pastry brush
- Sharp knife or pizza cutter
- Spatula (for flipping)
Method: Baking Your Tart to Perfection
Step 1: Prepare the Base
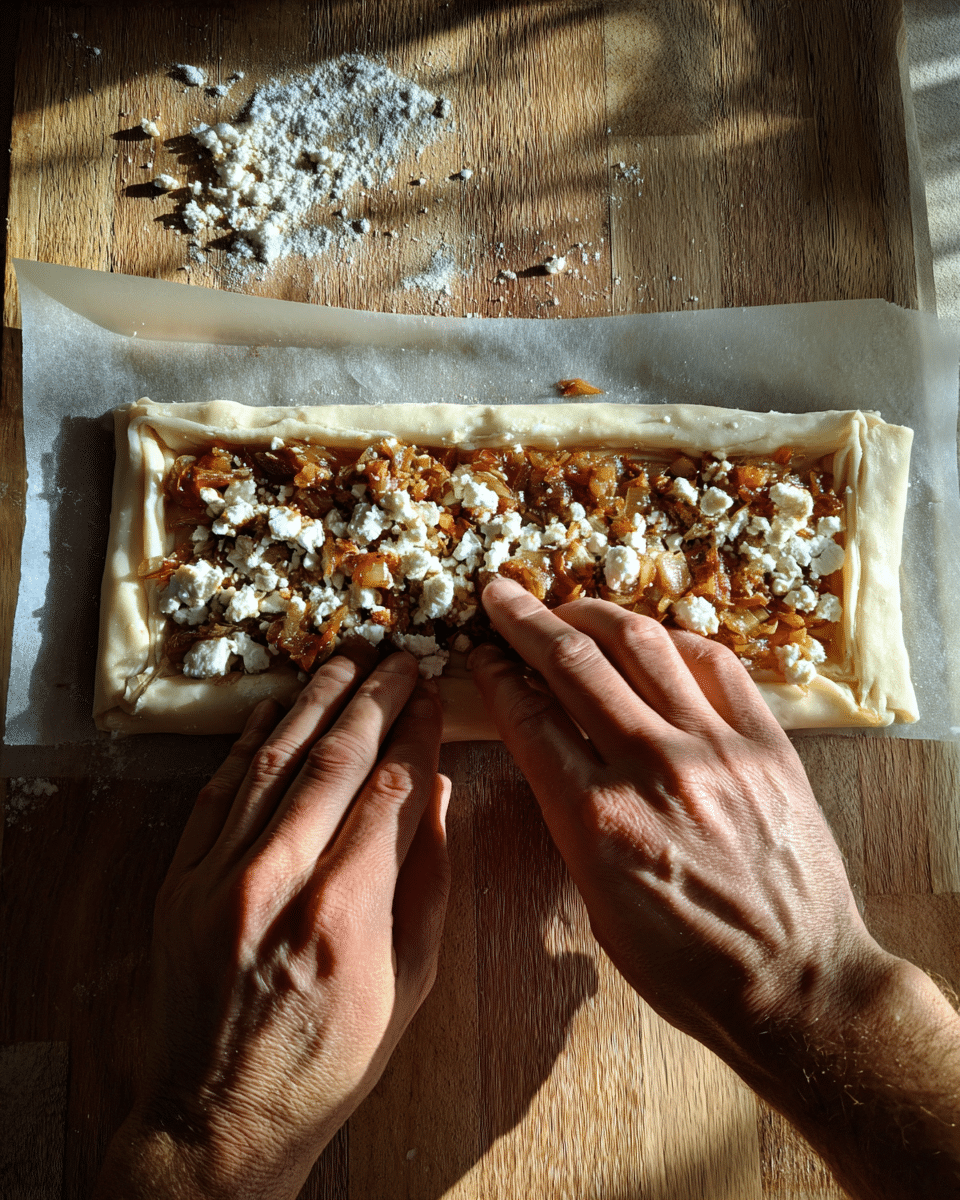
Start by preheating your oven to 400°F (200°C). While the oven heats, cook your base layer (onions, fruit, tomatoes, etc.) in a skillet with oil or butter. This caramelizes and reduces moisture. Let it cool slightly.
Lay parchment paper over your tray and spread your cooked ingredients in the shape you want your tart to take. Keep in mind—it will be flipped!
Step 2: Cut and Layer the Pastry
Cut your puff pastry sheet slightly larger than the ingredient base. Gently lay it over the filling and tuck the edges in. Brush the top with egg wash for that golden finish.
Use a sharp knife to poke a few small slits in the top (which will be the bottom once flipped). This lets steam escape and prevents sogginess.
Step 3: Bake
Bake for 20–25 minutes or until the puff pastry is deeply golden and crispy. Keep an eye during the last few minutes to avoid overbrowning.
Step 4: Cool & Flip
Let the tart rest for 5 minutes after baking. Place a large plate or board over the tray and flip it quickly but carefully. Peel off the parchment paper to reveal a perfectly caramelized top.
🔁 Variations to Try with This Base Recipe
| Filling Type | Ingredients | Flavor Profile |
|---|---|---|
| Sweet | Apples, cinnamon, brown sugar, butter | Caramel-like & cozy |
| Savory | Tomatoes, pesto, mozzarella | Bright, fresh, umami |
| Earthy & Creamy | Mushrooms, goat cheese, thyme | Deep, rich, aromatic |
| Tangy & Sweet | Figs, blue cheese, honey | Bold, sweet-savory fusion |
With this base method, you can experiment endlessly and adapt to what’s in season or in your fridge.

Best Fillings and Flavor Combos
The beauty of the upside-down puff pastry tart lies in its flexibility. You can go sweet, savory, seasonal, or even spicy—depending on your mood or what you have in the fridge. Because the fillings cook directly against the hot tray, their flavors intensify, caramelize, and transform.
Here are some of the best pairings to try for your next bake.
Sweet Fillings: From Apples to Berries
Sweet upside-down tarts are perfect for brunch, dessert, or a midweek treat. The sugar in fruits caramelizes beautifully when in direct contact with the pan, giving you that glossy, bakery-style finish.
Top Sweet Filling Ideas:
- Apple + Cinnamon + Brown Sugar: A nod to the classic tarte tatin. Add a pat of butter for richness.
- Pear + Almond + Cardamom: Elegant and aromatic.
- Mixed Berries + Vanilla + Lemon Zest: Bright and juicy.
- Banana + Caramel Sauce + Sea Salt: Deeply indulgent and foolproof.
💡 Pro Tip: Add a thin layer of crushed nuts or biscuit crumbs on the base (before fruit) to soak up any excess juice and maintain crispness.
Savory Fillings: Cheese, Veggies, and More
Savory upside-down tarts are dinner-party gold. The high heat coaxes sweetness from vegetables while cheeses melt and brown into irresistible crusts.
Top Savory Filling Combos:
- Tomato + Goat Cheese + Basil: A summer classic.
- Caramelized Onion + Gruyère + Thyme: Deep and bold flavors.
- Zucchini + Ricotta + Lemon Zest: Light and fresh.
- Mushroom + Fontina + Garlic: Earthy and umami-rich.
The key to success with savory fillings is to pre-cook vegetables like onions, mushrooms, or squash so they release moisture beforehand. Use harder cheeses that hold shape when baked and add herbs for extra lift.
Common Mistakes with Puff Pastry
Even though puff pastry is one of the most versatile ingredients in baking, it’s also one of the easiest to mishandle. And when you’re using it for an upside-down tart, even small mistakes can lead to big disappointments—like flat layers, chewy crusts, or soggy bottoms.
Here are the most common errors and how to avoid them.
Overhandling, Overbaking, and Underdocking
Overhandling the Dough
The more you touch puff pastry, the warmer it gets—and that’s bad news. Warm butter in the dough melts into the flour and ruins the flaky layers.
✅ Fix: Always work on a cold surface and keep your hands cool. Pop the pastry back in the fridge for 10 minutes if it gets too soft.
Overbaking the Tart
Baking too long can cause the bottom layer to burn or the sugars in the topping to over-caramelize and become bitter.
✅ Fix: Keep your eye on the tart in the final 5–7 minutes. Pull it once the pastry is deep golden and the edges look puffed.
Underdocking When Needed
While upside-down puff pastry tarts often benefit from full puffing, sometimes—like in a galette or open tart—underdocking (failing to poke holes) can cause uneven baking or trapped steam.
✅ Fix: Dock only when needed. For sealed, inverted tarts, skip docking to encourage height. For open-faced ones, dock the center to reduce puffing.
Avoiding Greasy or Dense Layers
Using Too Much Flour When Rolling
This can dry out the dough and affect its rise, leaving you with a crust that feels heavy and undercooked.
✅ Fix: Use just enough flour to prevent sticking—no more. Brush off excess before baking.
Skipping the Egg Wash
An egg wash isn’t just for shine. It also adds structure, prevents burning, and gives your tart that bakery-style finish.
✅ Fix: Lightly brush the top of the pastry with a whisked egg or just yolk before baking.
Using Wet Fillings Without Precaution
Juicy tomatoes, raw apples, or soft cheeses can release liquid and soak the pastry if not prepped correctly.
✅ Fix: Always roast or drain wet ingredients. Add a layer of cheese, ground nuts, or breadcrumbs under the filling to absorb moisture.
Mastering these puff pastry rules helps ensure your upside-down tart comes out crisp, golden, and as gorgeous as anything you’d find in a bakery window.
What are the rules for puff pastry?
Puff pastry must always be kept cold to preserve its flaky layers. Avoid overhandling the dough, roll gently using minimal flour, and never refreeze thawed pastry. Always let your baked tart rest for a few minutes before flipping to avoid tearing, especially with upside-down versions. When baking, make sure your oven is fully preheated—puff pastry needs strong initial heat to rise properly.
How do I keep my bottom puff pastry tart from getting soggy?
With an upside-down tart, the “bottom” is actually the top layer during baking, which helps prevent sogginess. Still, to guarantee crispness, make sure your fillings are pre-cooked or drained of excess moisture. Use a hot metal tray for baking and let the tart cool slightly before flipping. You can also add a thin layer of cheese, crushed nuts, or breadcrumbs beneath the filling to absorb juices.
Can you make puff pastry tarts in advance?
Yes! You can assemble upside-down puff pastry tarts a day in advance and store them in the refrigerator unbaked. They can also be frozen and baked directly from frozen—just add a few extra minutes to the baking time. Reheat baked tarts in the oven to restore crispness. Avoid using a microwave, as it softens the pastry.
What is the advantage of inverse puff pastry?
The upside-down method allows ingredients to caramelize directly on the tray, intensifying flavors and creating a glossy finish. It also solves the common problem of soggy bottoms by keeping the pastry exposed to dry heat. The result is a tart that’s crisp, golden, and beautifully presented—ideal for both sweet and savory creations.
Conclusion
The Upside-Down Puff Pastry Tart isn’t just another Pinterest trend—it’s a proven technique that delivers bold flavor, crisp texture, and stunning presentation in one easy bake. By flipping your tart-making process, you eliminate soggy bottoms, boost caramelization, and unlock endless creative combinations.
Whether you’re crafting a sweet apple tart with glossy perfection or a savory tomato and goat cheese showpiece, this method gives home bakers a reliable and versatile way to elevate their pastry game. Plus, with make-ahead tips and mini tart ideas, it’s just as practical as it is impressive.
Craving more edible art? Follow my culinary adventures on Facebook and save your next masterpiece on Pinterest!